Sunday, December 26, 2010

Quiche

Yummy note: What to do with the leftovers?! Don't throw them out, as here's a recipe for you to use up a few leftovers you might have from the holiday season in your freezer or fridge. Have the leftover ham and one of those pre-made frozen pie shells handy gets this recipe halfway done! Seriously, just throw this together and you have a meal ready to go. This quiche recipe can be made with quite the variety, too. I've made it using more of a vegetable theme, while using proteins in this makes a hearty dish too.

Quiche


Ingredients:
Pastry for 9 inch pie shell
3 eggs
2/3 c. milk
1 tsp. salt
Dash of pepper
1 1/2 c. (6 oz.) shredded cheddar (or another variety) cheese, divided
approximately a pound of protein/meat (ie: cooked breakfast or pork sausage, bacon, or diced ham)
* Optional varieties - Easily make a vegetable quiche by using broccoli, mushrooms, and tomatoes in lieu of the protein or add it into the meat to make a supreme quiche.

Directions:
Line 9 inch pie pan with pastry. Bake at 400 degrees for 3 minutes. Remove from oven and gently prick with fork. Bake 5 minutes longer. Let cool on rack.


Decrease oven temperature to 375 degrees. Prepare/cook protein, if not already cooked.


Combine eggs, milk and seasonings in medium mixing bowl, beat lightly. Stir in protein or desired vegetables. Sprinkle 3/4 cup cheese over the pastry shell. Then pour the egg mixture on top of the cheese. Top with the remaining 3/4 cup cheese.


Bake at 375 degrees for 50 minutes or until set and serve! Enjoy.

Wednesday, December 1, 2010

"pretty" easy waffles/pancakes

Yummy note: I enjoy involving my daughter in the kitchen. I find it to be a good learning experience, besides it being totally fun for her to help out like a big girl! So with this recipe, we found something that can easily be "prettied" up and look "cool," while she is enjoying a homemade meal. The simplicity of this waffle/pancake recipe makes it easy to have little helpers in the kitchen, while not making the meal preparation too complicated. I think I found this recipe originally on a kids or pregnancy website, which actually called it a kid's activity, but I like to call it a pretty easy waffle/pancake recipe to keep on hand. :)

"pretty" easy waffles/pancakes


Ingredients:
1 egg
3/4 cup milk
2 tablespoons oil
1 cup of self-rising flour**
1 tablespoon sugar
optional "pretty" things to add in: sprinkles and/or mini chocolate chips

** Note, if you don't have self-rising flour on hand, you can make your own substitute by using 3/4 cup of regular all-purpose flour and mixing in 1 tsp baking powder and 1/4 tsp salt.


Directions:
Mix flour and sugar in a bowl. In a separate bowl, mix egg, milk, and oil together. Pour liquid ingredients into the dry ingredients and stir.


(If you want, you can just add the egg, milk, and oil directly into the other bowl with the dry ingredients, but it is sometimes more fun for the helpers to pour things.)

Stir the ingredients together until mixed slightly, some lumps are ok, as too much stirring can toughen the pancake or waffle. Add in optional pretty ingredients if you'd like, such as the handful of mini chocolate chips and/or colorful sprinkles to make a special treat.


For waffles, preheat your waffle iron and spray lightly with cooking spray. Pour waffle batter into iron and cook until waffles are crisp and brown or until waffle maker indicates it is done. If making pancakes, preheat a lightly greased griddle/frying pan and pour as much pancake batter as desired into the hot pan. Flip pancake once it begins to bubble and finish on other side until brown. Note: Recipe makes about 8 pancakes or 3-4 waffles depending on size of waffle maker. I usually double the recipe when I make waffles, so we can have leftovers.


Enjoy with your favorite toppings, such as butter, syrup, jelly, or whipped cream!

Saturday, November 20, 2010

pumpkin cranberry nut muffins

Yummy note: I am always looking for those versatile recipes that are good morning, noon, or night... This muffin recipe fits it quite well. It is not only great for breakfast, but it is also a nice flavorful treat for a snack or dessert even. This recipe also hit my other top qualifier of easy to eat on the go. Muffins, bread, scones, you know, those little things that you can grab and run out the door with in the morning and snack on later when you don't have time to eat it at home. This muffin has a nice fall flavor of pumpkin and other spices, combined with the dried cranberries and nuts, it makes for a nice combination. I think this would make a perfect little housewarming goodie to bring to your Thanksgiving holiday parties for your host as a nice thank you!

Pumpkin Cranberry Nut Muffins


Ingredients:
2 cups flour
3/4 cup sugar
3 tsp baking powder
1 tsp ground cinnamon
1/2 tsp ground ginger
1/4 tsp salt
1 cup canned pumpkin (not the pumpkin pie filling kind, just the pureed canned pumpkin)
1/2 cup vegetable oil
2 eggs or 1/2 cup egg beaters substitute
1 cup dried cranberries
1/2 cup chopped pecans, if desired
decorating or coarse sugar, if desired


Directions:
Preheat oven to 400 degrees. Prepare your muffin pan with either 12 paper cup liners or grease muffin pan. In a large bowl, mix the flour, sugar, baking powder, salt, and spices. Next, stir in the canned pumpkin, oil, eggs, cranberries, and pecans until just moistened. Divide the batter evenly among the 12 muffin cups.


A nice tip is to use a large cookie scoop or an ice cream scooper worked great for keeping the muffin batter evenly distributed. Plus it makes for easy cleanup and less batter spills :-)

Sprinkle the optional decorating sugar or coarse sugar over the muffin batter before baking to make a nice finished look. Bake muffins 20-25 minutes or until a tester inserted in the center comes out clean. Remove baked muffins from pan to cooling rack and enjoy.

Friday, November 12, 2010

Cheese and Fruit Danish

Yummy note: I originally had this variation of a cheese danish the other day at work. A coworker's wife made this treat and it was just so good, I insisted on the recipe. It was originally made to it a 9x13 pan, but I wanted to scale back the recipe a little bit, since I was inspired to try something a bit different with the recipe. I wanted to add a fruit filling into the cheese portion. I really liked the plain cheese danish, but not knowing how well the fruit filling would hold up to the rest of the danish, I thought I'd better only half the recipe just in case. I had some family over, and I wanted to make sure we had something to eat for breakfast.. haha.. just in case I needed to use the other half of the ingredients to make a pan of the plain cheese danish. So you can either add in the fruit if you wish in your recipe or follow it straight for a plain cream cheese danish. Either way, it is pretty crispy, flaky and outright yummy to eat for breakfast or snack.

Cheese and Fruit Danish


Ingredients:
2 packages of cream cheese
1 tsp vanilla
2/3 cup of sugar for filling
1 egg separated
lemon
2 packages of crescent rolls (the crescent sheets work well for this, too!)
1/3 cup of sugar for topping
optional: about 1/4 cup jelly or jam for fruit filling


Directions:
Preheat the oven to 375. Mix the following ingredients together: 2 packages of cream cheese, 2/3 cup of sugar, 1 tsp vanilla, juice of 1/2 lemon, and the egg yolk. Note: save the egg white for
the top. Unroll 1 package of crescent rolls in a 9X13 pan. Spread the cheese filling over the crescent rolls. Next, if you want, spread on the fruit filling. Then, unroll the 2nd package of crescent rolls over the top of that. To finish it off, brush the egg white over the top and sprinkle generously with the 1/3 sugar.


Bake for about 25-35 minutes at 375. Note: I think the fruit filling in the cream cheese mixture takes a little bit longer when baking, so please adjust accordingly and watch for it to get nice and puffy, flaky and a golden brown or poke it with a tester to see if it is done.

Friday, October 29, 2010

fruit juice knox blox

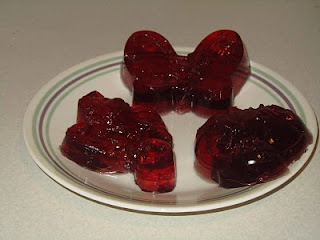
Yummy note: I had received a super cute butterfly and bug silicon mold pan for my birthday this year from a friend and I really wanted to try it out on something. Instead of trying the standard baked treat in it, I wanted to experiment with it differently. So we decided to make some wiggly jigglers, aka fruit juice knox blox. I think it worked pretty good, my only thing I need some advice on is perfecting the removal technique a little better. I think potentially I need to lightly spray cooking oil or something on the mold before or maybe let them sit in a warm water bath a bit before removing them?? any ideas? Other than that my kiddo loved them, and well, so did I. :) Using the fruit juice with the knox blox for this gives you a nice fruity flavor without having to have jello on hand, plus it is a little cheaper to make this way, too.


Fruit Juice Knox Blox

Ingredients:
4 envelopes Knox Unflavored Gelatine
1 cup cold fruit juice
3 cups fruit juice, heated to boiling
2 tablespoons sugar or honey, optional
Note: this is the same recipe you'll usually find on the back or inside of your Knox gelatine box.

Directions:
Open the packets of Knox unflavored gelatin and sprinkle the gelatin over the 1 cup of cold fruit juice in a bowl. Let gelatin stand for 1 minute or so to start absorbing the juice. Next, add your boiling juice to the gelatin bowl and stir together until gelatin is completely dissolved. This make take several minutes. Next stir in the sugar or honey if you want.

At this point pour your mixture in a pan or mold that you'd like to use. If using a pan, you can use either a 9x13 pan for a thinner jiggler or use a 9x9 pan for a thicker jiggler. Refrigerate gelatin until firm. Depending on your pan size, it might be about 3 hours or so until set. Next cut and serve jigglers or unmold your creepy crawly jigglers!

All the ingredients you'll need - 4 cups of juice and Knox gelatine

Letting the gelatin sit for a minute or so in the fruit juice starts making a gel like substance in your bowl.

Mold I used for my jigglers, but feel free to use whatever you wish!

Monday, October 11, 2010

3 Ingredient Peanut Butter Cookies

Yummy note:
Yes, you read it right, this recipe is a 3 ingredient peanut butter cookie. No flour or butter, shocking, right? I was very skeptical of this recipe at first, then I tried it, and liked it. Really it does work well and it tastes pretty good, or else I wouldn't be sharing it here! :) This recipe is great for beginner bakers too as there are not many ingredients to be scared of and most likely you already have these ingredients in your kitchen without having to do a separate shopping trip just to find that one ingredient you don't have for the recipe. These flourless 3 ingredient cookies are more of a dense cookie, rather than a big puffy type of cookie, but it is tasty. Super nice to have on hand when you are in a pinch and need to throw something together super fast to take somewhere. My additional add-in to these cookies is that I usually like it jazz it up a little bit by adding a handful or so of chocolate chips or candy in the cookies, or add it to the top of the cookies when done baking.


3 Ingredient Peanut Butter Cookies

Ingredients:
1 cup peanut butter (chunky or creamy)
1 egg
1 cup white sugar
*Can add in chocolate chips or candy pieces if you'd like

Directions:
Mix all ingredients together. Drop by teaspoonful on ungreased cookie sheet. Bake at 350 degrees for anywhere between 6-8 minutes, depending on the size of cookies you make and if you want them more softer/chewy vs a harder cookie. Makes about 1 dozen or so cookies.

Friday, October 1, 2010

crockpot applesauce

Yummy note: This fall, we ended up going apple picking a couple of times cause it was so fun. We went to some orchards in Michigan and Illinois. We got some delicious honeycrisp, gala, red delicious, and or course, who can forget the macintosh apples. I think we got a few other miscellaneous kinds too that the kids happened to pick up from a random tree or two from the orchards, too! So what to do with all those apples, well we made our share of apple crisp, apple pie, and now it's time to make one of my favorites with the leftover apples, applesauce! This is a pretty simple and easy recipe, really you just set the crockpot and forget about it for awhile to make some flavorful homemade applesauce! I like to double this recipe often to fill my crockpot full, so that I have a small package or so to put in my freezer for later.

Crockpot Applesauce


Ingredients:
4 medium apples, (the cooking variety of apples work best) peeled and cut into pieces
1/4 cup water to 1/2 cup water (may want to add more water later in the cooking process if you want a smoother or thinner applesauce)
1/4 cup brown sugar or 3-4 tbps granulated sugar
1/4 tsp cinnamon
1/8 tsp nutmeg
*if you don't have these spices on hand, I've also substituted those b using the pumpkin pie spices, that has a combination of several nice spices to use.

Directions:
Peel, core, and cut apples into fourths or smaller pieces if you'd like. Stir all ingredients (apples, water, sugar, and spices) above in a large crockpot. Cover and set slow cooker to 1 hour and 30 minutes on high. At this point, stir the apples and check on their consistency. At this point, if you think you need more water, add it in, or else you can wait more towards the end if you desire. After stirring apples and breaking them up a bit with a fork or masher, continue cooking them on high for another 30 minutes to an hour, depending on what type of apples you used. Depending on the apple variety, some cook up faster and softer than others, so be sure to keep that in mind. After apples have cooked for about 2 hours, mash and stir until consistency of the applesauce you like. I kept some of the applesauce on the chunkier side, while another batch, I pureed more in a blender to make it really smooth. Enjoy!!


Friday, September 10, 2010

caramel mix

Yummy note:
So this recipe is one of those snack mixes that can be thrown together quick and easy, as it doesn't have a lot of prep time. The real investment in it is the baking time. Every fall, I really see this snack mix in and around a lot of places. I think just about every pumpkin or apple orchard farm, I've been to, has this mix for sale for a little too much money than I'd like to spend. Really it doesn't cost that much to make a whole batch of these sweet and salty treats! Plus, you can then add whatever type of additional add-ins you'd like to the puffed corn for an additional treat ;)


Ingredients:

1 (8 oz.) bag "Old Dutch Puff Corn Curls" or Cheetos makes a buttered puffs version too
1/2 pound butter (can use margarine, but doesn't taste as good :)
1 cup brown sugar
1/2 cup light corn syrup
1 teaspoon baking soda

Additional add-ins: may also add in regular popcorn, cereal, pretzels, or other nuts to this mix. Note, if you do add in a great amount of add-ins, you might want to make more caramel mixture to cover your treats well.


Directions:

Place butter sugar and corn syrup in a 2-quart saucepan and cook together for about 2 minutes.


Bring to a slight bubble/boil. Next, add 1 teaspoon baking soda to mixture. This will cause mixture to foam, so using that bigger saucepan is helpful.


Place corn curls/puffs in large roaster pan. Pour caramel mixture over corn curls and stir until mixed.


Place in 250 degree oven for 45 minutes. Stir at least every 15 minutes. Remove from oven and pour on wax paper and break apart. Enjoy!!

Friday, September 3, 2010

mojo de ajo (aka delicious garlic olive oil)

Yummy note:
I was watching Mexico-One Plate at a Time show by Rick Bayless the other day and he was making this golden-colored garlic infused olive oil and it looked so easy to make and versatile, I had to try and make it. Surprisingly it was very simple to make, I just needed some time to bake it. It definitely made my kitchen smell garlicky and delicious. This garlic olive oil, Bayless called Mojo de Ajo, was worth the time to make ahead of time, as it has helped me save some time in a few other dishes later on when I've used the mojo de ajo. It has helped me get a meal thrown together very quickly, such as using it in place of anywhere it suggests using olive oil or a marinade. I've added it to pasta, chicken, breadsticks, and I'm sure you could use it in a few more of your favorite dishes too. It really gives you an added nice roasted garlic flavor without spending the time in the meal you are trying to get thrown together quickly.


Mojo de Ajo

Ingredients:
4 heads garlic (about 1 3/4 cups), peeled
2 cups extra virgin olive oil
1 teaspoon salt
1/2 cup fresh lime juice


Directions:
Heat the oven to 325 degrees. Prepare and peel garlic (can be done by smashing the garlic against side of a knife to release the clove from the skin lightly). Stir together the garlic, olive oil, and salt in an 8x8-inch baking pan. Place into oven and bake for about 45 minutes, or until the garlic is soft and light brown. Next, add the lime juice and stir. Put back into the oven and bake for an additional 20 minutes to continue baking. Next, remove mixture from oven, and mash the garlic into pieces, until broken apart. Pour the mixture into a covered storage container and refrigerate it until ready to use. The mojo will last for up to three months when refrigerated. This makes about 2-3 cups of mojo de ajo. Note, original recipe here: http://www.rickbayless.com/recipe/view?recipeID=244

Friday, August 27, 2010

Quick Muffins

Yummy note: Lately, I have been loving breakfast breads. Anything in a loaf or a muffin is good in my eyes. So I found a quick easy homemade muffin recipe that really didn't take that long at all to throw together. I think I found it on cooks.com website, and then tweaked it a little. Honestly, I am a little harsh on myself and I think I need to add a bit more flavoring to the batter at the end, but all in all it was a nice simple and easy recipe to execute.

Quick Muffins

Ingredients:
2 c. self-rising flour, sifted
(Note: If you don't have the self-rising flour, you need to substitute it with these ingredients instead: 1 c. all purpose flour, 1 1/2 tsp. of baking powder, plus 1/4 tsp. of salt)
3 tbsp. vegetable oil
1/2 c. sugar
3/4 c. milk
1/4 c. orange juice
1 beaten egg
2 - 2 1/2 c. berries (I used a frozen berry mix, but you could add fresh ones if available.)

Directions:
Combine egg, oil, milk, orange juice, and sugar. Add the sifted flour and stir until smooth. Next, stir in fruit and mix well. If using the frozen fruit, let the berries thaw a bit before adding them into the batter. At this point, I wish I would have added some more maybe like lemon or orange zest into the batter to make the flavor pop a little more, so I would suggest that in yours.


Next, pour muffin batter into paper liners in a muffin/cupcake pan and fill about 2/3 full.

Bake for 25 minutes at 400 degrees. Makes roughly 18 or so muffins, depending on the size of your muffins.

Monday, August 23, 2010

s'more fudge

Yummy note:
Summer evenings and warm weather makes you think of what other than s'mores. So going with that theme, I wanted to make s'mores, but inside where it was nice and cool :) Speaking of staying nice and cool, I really didn't want to do anything crazy or turn on my oven again, so I needed a recipe to either on the stove or in the microwave. Next dilemma I had was I had no big marshmallows or any chocolate bars! what?! I know, insane. So what I did have was graham crackers, mini marshmallows, and chocolate chips. So the start of s'mores fudge begins.


Ingredients:
18-oz semisweet chocolate chips (or about 3 cups)
14-oz can sweetened condensed milk
1/4 cup butter
1 tsp vanilla extract
1 cup mini marshmallows
1 cup chopped graham crackers

Directions:
Line an 8-inch square pan with aluminum foil and then spray with a cooking spray or grease foil with little bit of butter. Melt the the chocolate chips and the condensed milk together in a heavy saucepan (or in a double boiler) over low heat, stirring constantly, until melted and smooth.


Remove from heat; let cool 1-2 minutes, then stir in vanilla. Cool for about another minute and then add in the cups of the marshmallows and graham cracker pieces.


Stir until incorporated together and spread into your prepared pan. Refrigerate about 3 hours or until firm. To cut pieces of fudge easily, invert pan and peel off foil from fudge, and cut in 1-inch pieces.

Friday, August 13, 2010

Chicken BLT salad with Avocado Dressing

Yummy note:
Since the weather the last month or so has been just so sweltering hot, I hate turning on the oven some nights to prepare a meal, so we've been going with a few more salad options. We grill out quite a bit, so we had some nice meat and then add it to a salad for a refreshing cool crispy meal. I had picked up some nice looking tomatoes and some hearty bacon the other day at the store with the intentions of making BLTs. But instead, I had some leftover grilled chicken from the night before, and decided to toss it all together as a nice salad instead. It worked awesome. So here's my newest creation, a Chicken BLT salad with Avocado Dressing!


Chicken BLT salad with Avocado Dressing

Chicken BLT Salad
about 3 cups lettuce
2-3 medium tomatoes, cut into small wedges
1/2 pound bacon (about a half a package), cooked and crumbled
1/2 cup shredded Parmesan cheese
1/2 cup croutons
2-3 chicken breasts, sliced

Prepare bacon and cook until done. Reserve some of the bacon drippings for the dressing if you'd like. Crumble bacon a bit and set aside. Continue making the avocado dressing as noted below.
If you don't have chicken already prepared or leftover, grill off a few chicken breasts for the salad, while your dressing is resting.


In a large bowl, toss lettuce, tomatoes, and bacon together. At this point, to your preference, add the avocado dressing now, or wait to add it at the end, all depending how you'd like to incorporate it. Finish the salad and top with your chicken, croutons, and cheese.

Avocado Dressing
1 avocado
1 tsp onion flakes
1/4 cup milk (may need to add more depending on how thick/thin you like the dressing)
4 Tbsp sour cream
1/2 lime (juiced)
1/2 cup cilantro leaves
s salt and pepper to taste
* Optional: For more flavor, add a tsp or so of your bacon drippings (or bits) from the pan.


Prepare avocado and chop into pieces. Cream the avocado, either by hand or in a blender/food processor. Add in the rest of the ingredients, and mix until smooth. Chill for atleast 1/2 hour before serving. Note: Can keep leftover dressing in the refrigerator for about a day or two.

Monday, August 2, 2010

Tropical Beach Ceviche

Yummy note:
This week the recipe I'm featuring is not one of my own, but one of my favorite chefs, Rick Bayless. If any of you are on Twitter and are following Rick Bayless (@Rick_Bayless), you might know that he has a Fiesta at Rick's Twitter content going on now and running until the next few weeks I believe. http://www.rickbayless.com/news/view?articleID=152 Basically he will post a 140-character recipe from his newest book. This week the featured recipe was Tropical Beach Ceviche. This is what you had to work with: "8oz slicd raw scallops+1c grapefrt j:45 min.Drain;blend 2/3c juice,1-2 chipotles,4 rstd grlc,2T br sgr.Mix w scal, red on,trop fruit,jicama" -- Below is my rendition of the Original recipe that I did and submitted for the contest this week. Obviously I was a bit off the visual mark as I think I needed to add more of the chipotle sauce to my dish, as that is what most of the winners are shown with more sauce http://www.rickbayless.com/blog/?p=97#more-97. Oh well! It was still a fun experiment.

On a side note, my girlfriend Mandi (under Jeff F.) placed 2nd in the Rick Bayless contest a few weeks ago! Great job! http://www.rickbayless.com/blog/?p=22 My same friend, also braved the long lines the other night at the bookstore to meet Rick and score me a fabulous, signed copy of his latest book. Thanks again, Mandi, for snagging me a copy!


Tropical Beach Ceviche


Ingredients:
8 ounces raw shrimp (substituted fresh raw shrimp instead of the sea scallops)
1 cup fresh grapefruit juice
about a can of chipotle chiles en adobo sauce
several tablespoons of prepared chopped/minced roasted garlic
2 tablespoons brown sugar
dash of salt
2 cups diced tropical fruit (Instead of buying the mango, pineapple, papaya separately, I just bought a prepackaged jar of like a Dole tropical fruit fresh mixture located in the refrigerator section at the store. This was a nice time saver and saves some money, too.)
1/2 small red onion, thinly sliced
1 small jicama (about a cup peeled and diced)


special food note:
I didn't do a "true" ceviche on this, as I'm a bit crazy with the raw fish unless it is a sashimi or sushi grade, so I slightly precooked the raw shrimp. While in a true ceviche, the acidic juice marinade "cooks" the proteins, it doesn't really kill the potential bacteria. Because this is a shellfish, I decided to be a bit more safe than sorry.

Directions:
What I did first, I slightly cooked the shrimp in boiling water for about 2 minutes, just until the shrimp started to get a little pink. Next, I drained the shrimp and ran cool water over them. Next, chop the shrimp into about more bite-sized pieces, and add shrimp into a small glass or stainless steel bowl. Marinate the shrimp in the grapefruit juice and cover in refrigerator for about 30-45 minutes.

Next, I opened the canned chipotle chiles and diced/chopped well and placed them in a separate bowl with the prepared garlic and brown sugar. Mix all ingredients well with a fork, or if you'd like, place them in a blender to make smooth. Next, drain the shrimp and place about 2/3 cup of the juice into the chipotle mixture. Next finish off with a dash of salt, chopped fruit, diced onion, jicama, and shrimp and toss all ingredients together. Refrigerate your ceviche until ready to eat or enjoy as it is right away.

Monday, July 26, 2010

Easy homemade croutons

Yummy note: Wondering what to do with that leftover bread? Don't want to throw it away or take a lot of time making another dish with it in there, then this is your recipe! I love these homemade croutons, as they are nice and crispy, yet tender to the fork when you try and pick them up in your salad. What's worse then trying to get that crouton on your fork and all it does it break into a bunch of tiny pieces or worse yet, like me, if you have a slight clumsy notion, you'll send it shooting across the table. :) This recipe is perfect for avoiding those issues, plus it's quick and easy to make these homemade croutons to add to your meal.


Ingredients:
about 3 cups of bread cubes (maybe a half loaf of bread or 6 slices or so) (can use any type of bread, just as long as it is slightly dried out, or if it is a fresher bread still, throw it in the oven at 300-350 degrees for a few minutes to toast up a little before using)
1/2 stick butter, melted
1/4 cup olive oil
1/2 tsp garlic powder or crushed garlic
2-3 tsp assorted flavored herbs - such as oregano, basil, rosemary, thyme, or parsley
1/8 to a 1/4 cup grated
Parmesan cheese (if desired for a cheesy crouton)
salt and pepper to taste


Directions:
Preheat oven to 350 degrees. Cut the bread into cubes, about 1/2 inch to 1 inch sizes. (Again, if bread still seems a bit more soft, toss it in the oven for a few minutes before to start drying it out.) In a baking pan, like a 9x13 cake pan, add melted butter, olive oil, and seasonings. Stir together. Next, in the baking pan, toss bread cubes into butter/oil mixture and lightly coat. Add any other additional seasonings (like salt and pepper) if you wish. Once cubes are evenly and lightly coated, put croutons back into the oven and bake for about 20 minutes until bread is golden and crunchy. Toss cubes several times during baking to ensure even baking of croutons. In the last 5 minutes or so, add the
Parmesan cheese, if desired. Try not to add it too early on, or else it might burn on a bit. Let croutons cool and store in a plastic container or a plastic bag. They last up to about a week unrefrigerated or you can store in the refrigerator to last about 2 weeks.

Monday, July 19, 2010

peanut butter cracker treats

Yummy note:
A little bit of peanut butter, with a chocolaty coating crunch.... who couldn't want more?! These simple little cookie cracker sandwiches are super easy to make, seriously. I think I can get a batch of these little guys made in like minutes. What's even cooler, is I often have all these ingredients on hand in my pantry closet, so it's an easy and cheap fix. Also with a few variations, you can make some super cute cookie treats. Oh, and did I mention satisfying, since you have the salty, the sweet, and the crunchy treat, all in 1.


Ingredients:
about 1/2 cup creamy peanut butter
1 sleeve (4 ounces) round butter-flavored crackers (aka Ritz crackers work awesome)
about 8 ounces of chocolate bark or chocolate candy melts
sprinkles or any other decorative candy (or you can use a candy cookie mold tray)

Directions:
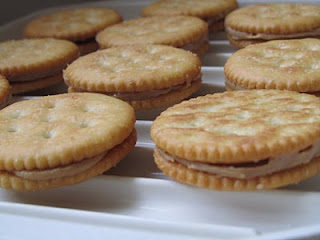
Spread a small amount of peanut butter on a cracker and top with another cracker.


Melt chocolate using a double boiler or if you don't have one of them, try this instead to make your own double boiler. Fill a sauce pan with 1 to 2 inches of water and place it over low to medium heat until the water begins to simmer. Use a pyrex or a stainless steel bowl that has a diameter larger than that of your saucepan and place it on top. Make sure that your bowl does not fall into the pan or touch the simmering water. Next, place your chocolate into the glass bowl and let the steam heat the bottom of the bowl to melt the chocolate without burning. You could also melt your chocolate in the microwave heating it at a lower wattage to avoid burning your chocolate.

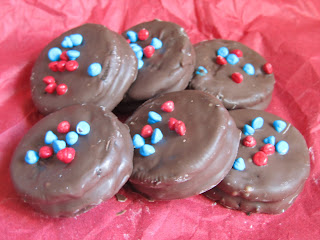
Next, dip the peanut butter sandwich crackers in the chocolate mixture, turning to coat thoroughly. Place on wax paper and decorate with sprinkles or candy if you wish.

If you have a candy cookie tray like the one I have shown below, you can fill those trays with the melted chocolate and then put the sandwich inside the tray to set up. For ease, I melted the chocolate in a microwave bag to be able to drizzle it with more control inside the tray. Let treats stand until coating is firm.


Store in an airtight container for up to 1 week or so. Makes about a dozen or so treats.

Another variation:
Instead of peanut butter, you could use Nutella or another flavored peanut butter in the middle of your crackers! Also, if you have extra melted chocolate, you can quickly make some chocolate covered Oreos!

Thursday, July 8, 2010

Carrot Cake Balls

Yummy note: Let me start out with I love this basic recipe for cake balls. It really has many endless possibilities... For this specific recipe, I made a yummy carrot cake and cream cheese combo dashed with a few walnuts. Hmmm.. its like a bit-sized piece of carrot cake, tell me who doesn't love that?! I wish I could recall where I first saw cake balls, or where I even got this recipe from I really do, as I just love them! So I'll send you to one of my favorite sites here, as I'm sure I'll be trying this recipe soon... don't they look so cute? http://www.bakerella.com/cupcake-bites-made-easy/

Carrot Cake Balls
Ingredients:
1 (16-ounce) can prepared cream cheese frosting
1 (18.25-ounce) box of carrot cake mix (plus ingredients called for on box)
1 package of Almond Bark Coating, Confectionery Wafer Coating, or Chocolate Chips
small package of chopped walnuts

Directions:
Bake the cake according to package instructions. While the cake is still a little warm, crumble the cake into a bowl. Crumble it into fairly fine crumbs and mix in the frosting. Note: You can use about 3/4 to a full can of frosting until mixture is a nice, not too moist, not too dry consistency. Next, chill the cake/frosting mixture for atleast 2 hours. Using a small cookie scooper or your hands, form the mixture into 1 to 1 ½ -inch balls.
Place the balls on wax paper or parchment paper and freeze for several hours before dipping them. This step allows you to handle the cake balls so that they don't fall apart or get too crumbly. Next, when the balls have chilled and are ready, melt some Almond Bark Coating (or whatever chocolate coating you choose), according to the package directions. Next remove cake balls from freezer and dip the cake balls into the coating. To dip the balls, use either a fork or even toothpicks can work well, too. Next, remove the cake ball from the coating and place on the wax or parchment paper. At this point, when I made my carrot cake balls, I sprinkled walnuts on top before the coating had set up. You may decorate as you wish, such as using sprinkles, chocolate chips, coconut, etc. Store in refrigerator/freezer when finished. Makes about 30 or so cake balls.
So speaking of endless possibilities for this recipe, here's just a few I've either tried or want to try!
• Devil's food cake or a brownie mix with fudge icing with a chocolate coating • White cake with white frosting mixed with sprinkles inside and topped with a white sprinkled coating • German chocolate cake with coconut-pecan icing and then topped with milk chocolate coating • a spice cake with cream-cheese frosting and a vanilla coating • Lemon cake with lemon frosting and vanilla coating • Chocolate cake with vanilla frosting and mint-flavored coating • Red velvet cake mix with cream cheese frosting dipped in white chocolate coating