Sunday, February 28, 2010

Strawberry cream cheese sugar cookies

Yummy note:
I was looking at making something on the fruitier side the other day for our girlie crafty day that was coming up. I knew I wanted to make some type of cookies, so I was trying to figure out something that wasn't too sweet, so I went for a nice light cookie. I used a prepared strawberry flavored cream cheese with this, but you could totally use whatever flavor you'd like to make the cookies that way as well. I wish the strawberry flavor in the cookie was a bit more, so maybe next time I'll figure out how to make a modification. Even though this cookie had cream cheese added in it, I was amazed that it wasn't too rich. I was really happy how the texture of this cookie ended up, along with how soft and moist it was.


Ingredients:
1/2 cup white sugar
1/2 cup powdered sugar
1 cup butter, softened
1 (3-oz.) pkg. strawberry cream cheese, softened
1/2 tsp salt
1 tsp vanilla
1/4 cup egg substitute or 1 egg
2 cups all-purpose flour

Directions:
Combine all ingredients above except for flour and beat until light and fluffy. Add the flour and mix well. Next, be sure to not skip this step or you'll be in for some issues later when you try and roll out your cookie dough. Either wrap dough in plastic wrap or put in a ziploc bag and chill. Refrigerate atleast 1 hour so that you can roll out the dough with ease.

After dough has chilled, roll out a manageable amount on a floured surface. You might need to put some more flour on top of the dough so that it does not stick. Keep the remaining dough chilling, as the dough gets sticky pretty fast if not kept chilled and makes it very hard to roll out. Cut out using cookie cutters or other desired shapes. Place on ungreased cookie sheet, about an inch or two apart, and bake in a preheated 375 degree oven about 6 to 10 minutes or until light golden brown.


To top the cookies, you could do it a variety of ways. For once batch, I made a simple icing glaze of 1 cup of powdered sugar and about 1 tablespoon of water mixed together. To continue with the strawberry flavor, I added in a couple of teaspoons of strawberry flavored syrup into the icing. Spread on cooled cookies. On another batch, I spread a thin layer of strawberry preserves/jam on the unbaked cookies and continued to bake the cookies that way.

Tuesday, February 23, 2010

Monster Cookies


Yummy note:
This original recipe was one of my family staples, you know, it's one of those recipes that I got in my recipe collection book when I got married. Luckily, I had it in there when the hubby requested "monster" cookies the other night, or else I was planning on devising some oatmeal peanut m&m type of cookie to meet his "monster" needs. :) Really, this is like one of those kitchen sink type of recipes, that you can add whatever you'd like almost to your preference.
Some of the switch-ups I've used, were to use Peanut M&M's or dark chocolate ones instead of regular ole milk chocolate M&M's; change up the peanut butter options- chunky or smooth; instead of the wheat germ, I actually added in rice crispies cereal to give more crunch. One other change I did, was to use an egg substitute instead of the whole eggs. I actually think this change made my cookies more moist than previous versions. Happy creative cookie-making! Enjoy!

Ingredients:

1 stick margarine- softened
3 eggs - (or 3/4 cup egg substitute)
1/2 cup + 2Tbsp white sugar
1 cup brown sugar
1 Tbsp vanilla
1 1/2 cups peanut butter
2 tsp baking soda
4 1/2 cups old-fashioned oatmeal or rolled oats
1/2 cup chocolate chips
1/4 cup coconut
1/2 cup M&Ms

Add any of the following optional ingredients:
1/4 cup chocolate covered raisins
1/4 cup chopped nuts
1/4 cup wheat germ


Directions:

Cream margarine, eggs, both sugars, vanilla, and peanut butter until well blended. Gradually add dry ingredients in order given. Roll into small balls, about the size of walnuts, and roll into granulated sugar. Place cookies on lightly sprayed/greased cookie sheet. Bake at 350 degrees for 8-10 minutes. DO NOT OVER-BAKE unless you want a crispy cookie or crunchy cookie.

Note, this makes 4-5 dozen cookies.

Friday, February 19, 2010

birthday butterfly cupcakes

Yummy note:
Last year, I won a raffle at work where I acquired a book the company I work for publishes called "Hello, Cupcake!" I thought it was a very cute and whimsical book of ideas, but really didn't see myself making any of these cute cupcakes that often. I thought that they'd take way too long to make and be not worth it. Boy, was I wrong! It was my friend, Mandi's birthday, so my other friend, Katie and I decided to surprise her with a treat of homemade chocolate butterfly cupcakes. It was so fun and definitely worth the time to make to see the excitement on our friends' faces and to see our kids' reactions to how cute they were. Thanks for the idea, "Hello, Cupcake!"


Chocolate Cupcake Recipe:
1 3/4 cup flour
1/4 cup unsweetened cocoa powder
3/4 tsp baking soda
1/2 tsp baking powder
1/2 tsp salt
1 1/2 sticks (12 tbsp) unsalted butter (softened)
3/4 cup brown sugar
2 large eggs
2 oz unsweetened chocolate melted
1 cup buttermilk
1 tsp vanilla


Preheat oven to 350 degrees Fahrenheit. In one bowl whisk flour, cocoa powder, baking powder, baking soda, and salt. In another bowl, beat butter and sugar until light and fluffy. Next, add eggs (to butter/sugar bowl), beating well after each one. Then beat in melted chocolate. Next add the flour mixture alternately with the buttermilk in batches; starting and ending with the flour mixture. Stir in vanilla. Fill the cupcake liners about 3/4 full and bake 15-20 minutes or until toothpick inserted in the center comes out clean.

While the cupcakes were baking, I started to prepare the butterfly wings. Start with a pattern for the wing pieces and antennae, which I got mine from the "Hello, Cupcake!" book. I traced the pattern on the waxed paper. Next I melted the colored chocolate wafers and put them into piping bags for ease. I started to trace, color in and fill my outlines with colored chocolate. See wings and antennae pictures below. If you want, you can add some sprinkles or other finishing touches to the chocolate butterfly bodies while they are still setting up. Once that's completed, I set those aside or in the fridge to set up and harden. (This step doesn't take that long actually. The chocolate hardens pretty quickly when you use the wafers.)

For frosting, I just used a boxed mix of Wilton's Icing Mix to cut down on some of our time in the kitchen preparing. Mix frosting according to the directions and added food coloring to tint the frosting to the desired color.

Once the cupcakes are ready, it's time to start making the butterflies! Frost the cupcakes, and place some small candies (we used brown M&M's) on the frosting, under the wings of the butterfly to give them some lift and on the cupcake. Add the antennae, and next pipe some more of the chocolate down the middle of the two butterfly wings to bring the butterfly to "life" - this completes your butterfly body! Start assembling butterflies as you wish and make a beautiful field of your own with a little bit of creativity and fun! Enjoy!


Original recipe design taken from the Hello, Cupcake! book by Karen Tack & Alan Richardson

Sunday, February 14, 2010

Cheesy Garlic Biscuits

Yummy note: I first fell in love with a version of this yummy biscuit at Red Lobster. It really can't be beat there, no matter what. I don't think my version has ever gotten that close. I mean this Bisquick recipe I use is good, but can't seem to get the right amount of garlic, butter, and herbed goodness that Red Lobster can achieve. Oh well, I guess that why they get paid the big money for, right?


Ingredients:

2 cups Bisquick baking mix
2/3 cup milk
1/2 cup shredded cheese
2 tbsp butter/margarine
1/2 tsp garlic powder
1/2 tsp parsley (optional)

Directions:

Preheat over to 450 degrees. Stir the baking mix and milk together until the dough forms. Then add in the shredded cheese and 1/4 tsp garlic powder and stir.


Place the dough on a floured surface and knead about ten times. Roll dough out to about 1/2 inch thick and use a cookie cutter to cut biscuits. Place on ungreased baking sheet and bake for about 10 minutes or until golden brown. At the end, brush the top with the butter and sprinkle with more garlic powder and parsley if you'd like.


Original recipe found here on Betty Crocker's site cheese garlic biscuits

Saturday, February 13, 2010

Potato Soup

Yummy note:
I've made this soup several different times, and I think I've changed it like every time I've made it, but that's what great about this recipe! You can use the first part of the soup as a base and always switch up the other ingredients a bit. You modify it and make it to be a thick creamy soup, a cheesy soup, or a clear broth type of soup in a matter of minutes. Enjoy whichever way you decide :)


Ingredients:
1 tbsp olive oil
1 tbsp butter
1/2 onion, diced
1/2 cup celery, diced
1 cup carrots, chopped
1 to 1 1/2 cups ham, chopped
4 cups unpeeled or peeled potatoes (your preference), chopped
1 cup water
1 chicken bouillon cube
Couple of tablespoons leftover ham juice/drippings from the ham
*Note, I skimmed off some of the real fatty stuff first from the leftover ham juice and used a good couple tablespoons for flavoring. You can always add additional later on if you want a stronger flavor. If you don't have any leftover drippings, you can always add in another bouillon cube or two.
1 tsp parsley
1/2 cup milk
about 4 tbsp flour
salt and pepper to taste

Easy add-ins:
Broccoli
Bacon
Cheese
Chives

Directions:
Add butter and olive oil into a frying pan, and add onions, celery, and carrots. Begin cooking for a few minutes. Next add in a handful of the chopped ham and about a tablespoon of the ham juice and continue to saute until the onions are tender. In a bigger sauce pan, add in the potatoes and add enough water to cover and bring them to a boil. Add in a bouillon cube. Cook until the potatoes start to get tender. Next add in a few more tablespoons of the ham juice to the water/potatoes, along with the rest of the ham and the onions, celery, and carrots mixture. Sprinkle in some salt, pepper, and parsley. Cook for about 5 minutes so the soup starts coming together. At this point, in a separate bowl, stir together milk and flour so it is smooth and can be added to the soup. Gradually add milk\flour mixture to the soup to let it start to thicken up the soup. At this point, you could add in cheese also to make it a more cheesier soup. Now simmer for about another 5-10 minutes until thickened. Serve with sprinkled cheese on top and a biscuit or bread on the side.


Tuesday, February 9, 2010

Easy BBQ sandwiches

Yummy note: This is one of my simple recipes I keep handy all the time. It is so easy, and doesn't take long at all to do. This BBQ recipe is something I can quickly throw together even if I don't have a refrigerator or pantry full of food available. You only need a few ingredients and you've got a simple yummy sandwich for a meal.


Ingredients:
1 pound of ground meat (we use turkey or beef)
1/3 cup brown sugar
2/3 cup ketchup
1/2 tsp Garlic seasoning
1 -2 tsp Onion flakes
Salt/pepper to taste


Directions:
Brown the ground meat in a pan until fully cooked. Next add in the rest of the brown sugar, ketchup, and seasonings.

Continue to cook and stir the mixture, until it starts to simmer. Continue cooking on low and simmer meat for about 5-10 minutes, as the flavor of the sauce will continue to incorporate with the meat. Once finished, spoon meat on top of your sandwich.

Optional add-ins ingredients:
small diced onion
small diced pepper
can of small diced tomatoes


Sunday, February 7, 2010

Grandma's Cinnamon Rolls

Yummy note: Where to even start on this post. This recipe was my grandma's recipe. It is a completely made from scratch recipe that does some time to prepare. I will not kid you about that, but it is SO worth the time. It isn't a very hard recipe, it just takes some time to let the dough rise a few times before it is baked. It really reminds me of all the love and care that my grandma had put forth while making this recipe. Every Sunday after church, we went to her house where she seemed to always have her cinnamon rolls or coffee cakes sitting on the table for breakfast. Since my grandma's passing, the last few years, my mom and sister have occasionally made her rolls, but really I think no one has been able to make them like grandma did. So here's the original recipe of my grandma's cinnamon rolls.


Ingredients:
2 cups milk
2 pkgs yeast
1 tsp sugar
1/4 cup warm water
1 egg
1/2 stick of melted margarine or butter
3/4 cup sugar
1 tbsp salt
4 tbsp oil
6 cups flour
2 tbsp cinnamon
1 cup sugar

Directions:

On the stovetop, heat milk in a small saucepan until it begins to bubble. Remove from heat before it starts to boil or scald. Let it cool a bit, and skim the top of the milk removing that filmy-like layer. While the milk is cooling down, dissolve the 2 pkgs of yeast and 1 tsp of the sugar in 1/4 cup of warm water in a small bowl. This yeast mixture should become bubbly over a few minutes.

Next add 1 egg, 3/4 cup sugar, 1 tbsp salt, and the 4 tbsp oil to the cooled milk and mix well with a beater. Then add 2 cups flout to the mix and beat well. Then add yeast mixture into the flour mixture and mix in BY HAND. No need to use the beater for any more of the recipe. After stirring in the yeast mixture, add in 2 more cups of flour and mix. Last add the final 2 cups of flour and mix until incorporated well.

Now knead the dough in the bowl with well-greased hands until the dough becomes smooth and soft. I used a vegetable spray on my hands to keep them from getting too sticky. Also if the dough is too sticky, you might need to add a little more flour, a tablespoon maybe at a time, until the dough has become no longer sticky.


Next cover the dough in the bowl and let it rise about 15 minutes and then punch it down. Cover again and let it rise again until the dough doubles in size. Could take up to an hour or so depending on how warm it is in your kitchen.

Once dough is ready, cut it in half. Roll one half of the dough out on a floured surface. Next take the melted/softened butter and spread it over the dough. Then sprinkle the cinnamon and sugar mixture on that. Roll the dough up like a jellyroll (rolling the long end edge up). Then cut into 1 inch to 1 1/2 inch slices and place into a greased 9x13 pan.

Each dough half makes roughly anywhere from a dozen to 15 rolls. Repeat process again for the other dough ball. For the one batch, I substituted brown sugar instead of the white sugar, which resulted in more of a caramel roll.

For that caramel batch, I also melted a 1/4 cup brown sugar, 2 tbsp butter, and 1 tbsp light corn syrup together for a caramel goo that goes into the bottom of the 9x13 pan.


After you place the rolled dough pieces in your pan, let it raise again until maybe doubled in size. Then bake about 12-15 minutes until golden grown in a 350 degree oven.

To top the rolls, I made just a simple vanilla glaze frosting. Frosting ingredients included, 2 cups powdered sugar, 1 tbsp melted butter, 1 tsp vanilla, and about 2 tbsp milk. All depending on how thick you'd like the glaze, add more or less milk.

Thursday, February 4, 2010

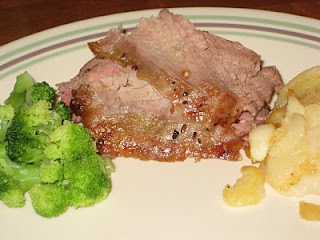
round roast

Yummy note: Trying to be a thrifty shopper I frequently watch for those great meat sales that go on and I managed to snag up this 2 lb eye round roast the other day for only like $5, which is a fairly good deal since we got two meals out of it. Eye of round is best for making Italian roast beef sandwiches, and really shouldn't be overcooked. Overcooking can be my nemesis. I have a tendency to do that... I'm working on that.. so this was a challenge for me. I honestly was a bit scared in trying to make this after I picked this up, not realizing it wasn't my "normal" cut of roast I get. But hey it was a great deal, so it was worth a shot. Needless to say the hubby was very excited about the turnout and is now hoping this is a regular in our meal rotations. Now on to getting the kiddo to eat a more variety of meat, other than chicken, hotdogs, and sausage.

Note on the eye round roasts- It's an extremely lean cut of meat you'll find, so anything past medium is pushing the tough and dry category. I cooked this medium, as I am not a fan or medium-rare, which good old Betty Crocker cookbook told me to do it at. You really want to use a meat thermometer for this dish unless you are a pro at the touch test...which I am NOT, so I rely on the thermometer for everything.

Ingredients:
2-3 lb eye round roast
1-2 tsp olive oil
garlic powder
salt and pepper
Steak seasoning


Directions:
Mix together a little bit of salt, pepper, garlic powder, and a good amount of some steak seasonings. This mixture is really just a throw it all together to what you think will work for the amount of the roast you have. Sorry to be so vague, but I just tossed some seasonings together for this one. So I took the seasonings and sprinkled them around the entire roast to coat evenly.
I then used a cast iron fry pan and just browned all sides of the roast in a little olive oil on the stove, only for a few minutes. Preheat the oven to 325 degrees.

Place the pan directly in the oven after you've just browned the outside of the roast. Bake about 20-25 min per pound or until you've reached your desired temperature of the roast. Betty Crocker cookbook says to take the roast out of the oven at 140 degrees for a final resting temperature of 145 degrees. This will result in a medium-rare roast. I prefer more medium, so I left it in the oven a bit longer and waited until the temperature was reading closer to 145 degrees before I took it out. My final resting temp was close to 150, which was probably almost too done for some people, but it was still good. Remember, you can usually expect the meat to keep cooking for the last few minutes while it is resting.


So after taking the meat out of the oven, let it sit for about 10 minutes before cutting into the roast. This roast is best sliced very thin and enjoyed that way. We ate it with sides of sliced fried potatoes and broccoli.

What's best about this roast is the meal the next day... we sliced the meat very thin, and saved it for Italian beef style sandwiches the next night. hmmm, toasty bread with beef and cheesy.

Wednesday, February 3, 2010

special k scotcheroos

Yummy Note:
This is one of those snacky dessert bars that always seems to make an appearance at the holiday time, especially with my family. The last few years around the holidays, these little bars see many different variations, such as my uncle makes them with special k cereal and some goey concoction, while my mom uses rice crispies and butterscotch chips in her recipe. I decided to take a stab at my own version. So I wanted to make it er.. "healthier" haha.. by adding some honey to it to replace some of the sugar one of my original recipes calls for. So here's my take.


Ingredients:
1 cup brown sugar
1/2 cup white sugar
1 1/4 cup light corn syrup
2 cups peanut butter
1-2 tablespoons honey
6 cups Special K cereal
1 cup chocolate chips
1/2 cup peanut butter chips

Directions:
Cook corn syrup, honey, and sugars together over medium heat stirring occasionally until it starts to boil.

Remove from heat. Add peanut butter and stir until smooth.


Pour contents over Special K cereal and stir until coated. Press into a buttered 9"x13" pan. Melt chocolate and peanut butter chips together and spread over bars.

Monday, February 1, 2010

Italian Orzo Chicken

Yummy note: Usually make this chicken a lot in the summer time on the grill. Really this is the best way to prepare the chicken, but since the grill has some snow and ice on it still and it's a bit too cold to venture outside, the oven will do just as nice. The recipe turned out just as good when I baked it, but I can not wait for warmer temperatures to hand off the chicken to the husband to fire up the grill for some yummy Italian grilled chicken...

Italian Chicken and Warm Orzo


Italian Chicken

Ingredients:
1 packet Good Seasonings Italian Dressing Mix
1/4 cup red wine vinegar
1/4 cup olive oil
1/4 cup vegetable oil
juice from 1/2 lemon and 1/2 lime
1-2 lbs of chicken breast

Directions:

In a big measuring cup or bowl, mix the Italian dressing mix according to the package directions using the vinegar, water, and oils. Next add in the juices from the lemon and lime. Next place the chicken breast pieces in a gallon-sized zipper plastic baggie and pour the dressing mixture over the chicken. Close the bag and put in the fridge and let it marinate for atleast 20-30 minutes. If you are not in a rush, I'd let it marinate for atleast an hour for more flavoring.

Preheat oven to 350 degrees. Next place chicken pieces in a baking dish and bake uncovered for about 30 minutes or until meat thermometer reaches atleast 165 degrees or until juices run clear.


Warm Orzo Dish

Ingredients:


1/2 box of Orzo pasta
1 14.5 ounce can of Diced Tomatoes w/ Garlic & Olive Oil
1 cup thawed frozen corn
1/2 of a green pepper-sliced thin
1 bunch of fresh spinach, washed, stems removed
1-3 tbsp olive oil
1 tbsp butter
1/2 cup parmesan cheese - shredded
salt/pepper to taste

Directions:
Bring a pan of water to boil to for the orzo. Once water is boiling, add orzo pasta and cook about 9-10 minutes. While orzo is cooking, prepare the spinach and peppers. Trim the ends off of the spinach and cut into small julienned-like strips. Clean the green pepper and slice finely either half or a whole pepper to your liking, it is up to you. In a fry pan, add the butter and about 1 tablespoon or 2 of olive oil. Heat pan and add spinach and peppers and stir until peppers are tender and spinach has reduced down. Next add in corn and can of tomatoes. Don't drain the juice from the diced tomatoes, as that adds more flavor.

Stir and simmer all ingredients for about 5-10 minutes. At this point, your orzo pasta should be done. After you drain the orzo, you can add the orzo and the vegetable mixture together and stir until well blended. Season with salt and pepper. Then, sprinkle with parmesan cheese on top of the warm orzo.

Variations: If you want if cheesier, you can stir in additional cheese at the end as well as just adding it to the top. Also, a nice way to finish up the orzo is to serve it in a whole roasted pepper as well. You can bake this as well, such as put the orzo mix into the cleaned out pepper "cup" I'll call it and bake it in the oven for a few minutes to roast it. After a few minutes, add on some parmesan cheese to make a nice crispy cheesy top.