Sunday, November 27, 2011

Happy Thanksgiving! a little late

Yummy note:  It has been a rough, not to mention busy few weeks around here and I'm sorry I haven't had time to "officially" blog lately, but I thought I'd post a few quick pictures from my phone of one of my creations. The kids, and even the adults, sure loved these cute turkeys at our Thanksgiving. I hope everyone had a good thanksgiving and enjoyed some time with your family and friends. -Heather


Turkey-Shaped Rolls
Ingredients: 
2 frozen bread dough loaves 
1 egg white
Optional "decorations" - maraschino cherries, cheese, m&m's, olives, pepperoni, chocolate chips, or other small edible items would work well.


Directions:

Thaw frozen bread loaves, according to package directions. I let mine sit overnight and they got quite large... but it still worked fine! 


With a knife, cut loaf of thawed bread in pieces. I think I got about 10 pieces from each loaf. Take each piece and shape gently. Place roll down on a lightly sprayed baking sheet or parchment paper covered baking sheet. Arrange rolls into desired shape. Yummy note: You could so make many more fun shapes with these rolls for any given occasions. I'm thinking a Christmas tree shape will work well for the upcoming holidays. (Ooh, and imagine all the decorating possibilities!)


Brush rolls with an egg white wash (just an egg white beaten slightly) or desired toppings. I used egg whites on one and on the other rolls I used a olive oil and pizza seasonings. (Both ways were delicious!) Bake in 350 degree preheated oven for about 15-20 minutes or until browned.


I had to improvise on this turkey, he was a bit too large to fit on a normal baking sheet! So I turned over two baking sheets and set them together with parchment paper to cover them and baked it that way. I used maraschino cherries, cheese, and m&m's for facial features, but olives, pepperoni, chocolate chips, or other small edible items would work well for decorated your edible creation. 

Monday, November 14, 2011

Caramelized Chickpeas

Yummy note: Even before picking my assignment this month for the Secret Recipe Club, I knew I wanted to challenge myself a bit more than normal. I wanted to use what I already had in my kitchen to make something, so that meant no crazy long grocery list to get stuff. I was excited to see I was assigned Averie's blog called Love Veggies and Yoga. It was perfect, as I found lots of simple recipes, fresh ingredients, and not calling for too many weird ingredients that I didn't have. She had some great healthy recipes to pick from, not to mention even some sweet treats. Just recently, Averie posted this-- can I say I can't wait to make her newest creation of these butterfinger bars, as I have lots of leftover candy corn! My final three was narrowed down to this hearty vegetarian southwestern soup; the recipe with ketchup in the title, as anyone that knows me well, my daughter and I love ketchup;  or the fake me out honey roasted "peanuts" recipe featuring chickpeas.  Drum roll, please... the one I ended up picking was the Caramelized Chickpeas!   

Caramelized Chickpeas
(aka Caramelized Garbanzo Beans)

Ingredients:1 can (15 oz.) of chickpeas (also called garbanzo beans)
2/3 c brown sugar
1/2 c white sugar
1 - 1 1/2 tsp cinnamon
a pinch or two of coarse salt for dusting at the end
Directions: Drain and rinse your can of chickpeas. Stir the sugars and cinnamon together. Put sugar-cinnamon mixture in a bowl or a covered container. Roll the chickpeas in the sugary mixture, or shake container gently to coat your chickpeas in all of the sugary goodness. I like to keep a hand free and fairly clean in the kitchen nowdays with this little chickpea cruising around now getting into more stuff.
I love to shake things, mommy--let me help!


Place coated chickpeas on a foil or parchment covered pan or cookie sheet. This is SUPER important. As Averie noted on her blog this mix "...will have you cursing." Indeed, I see why. lol. It gets very sticky and gooey, but oh, so delicious... so just prepare yourself for caramely mess :)
Bake the chickpeas at 375 degrees for about 30-40 minutes or until bubbly good. Make sure you watch it closely towards the end, as you don't want to burn your caramelized chickpeas, so I always go by the "nose knows" in the kitchen so when it smells good, it is probably about done.
Allow chickpeas to cool before indulging, as they get crunchier as they cool, then enjoy!


Oh, and I forgot to mention... the crispy little caramel left bits, aka, awesome toppers for my caramel coffee drinks I make! mmmm...  


If you'd like to participate in the monthly secret recipe fun, or learn more about our group, check out the site http://www.secretrecipeclub.com.


Monday, November 7, 2011

mashed potato puffs

Yummy note: I came across this recipe recently in search for the perfect mashed potatoes. Just in like the last month now, I've made it a couple of times now with little variations each time I've made them. I've made little mashed potato "cupcake" like puffs and mashed potato "tots" - both I think equally tasty. I'm always trying to disguise mashed potatoes at our house, as my oldest child despises them. Seriously... like won't try them in their "original" form anymore--if mashed potatoes really have an original form?? :-)   It really is sad, as mashed potatoes are awesome, and always around for the holidays, not to mention they are great for leftover, such as this one! So I keep trying in hopes someday she appreciates the mashed potatoes.  When I saw Tina's crazy cooking challenge at Moms Crazy Cooking this month for mashed potatoes, I thought this would work great. I mean I'm always trying to challenge myself and come up with the best mashed potato recipe at home, so Alicia will try them! So I gave this recipe a whirl-- it was a mashed potato puff recipe from a blog named Janet is Hungry


Mashed Potato Puffs 
 Original recipe adapted from the blog Janet is Hungry


Ingredients: 
3 cups mashed potatoes (roughly 2lbs of uncooked potatoes), already prepared*
1/3 cup (3-4 ounces) cream cheese. I used the cream cheese with onions and chives in it to add in more flavor
2 eggs, slightly beaten
1/4 cup softened or melted butter
salt and pepper to season 

*optional- panko bread crumbs for rolling puffs into
*optional- crumbled bacon bits


Directions:
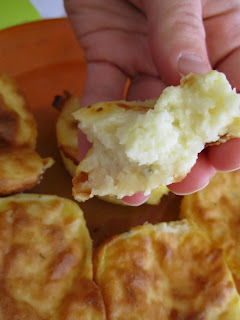
Have already prepared mashed potatoes measured out in a big bowl. *To make your mashed potatoes, have peeled and cut up potatoes in a large pan of water and bring to a boil. Cover and simmer for about 20 minutes or until potatoes are fork tender and drain off water. Then mash until no lumps are present. Then add in your cream cheese and butter. Whip together until smooth and then add in beaten eggs. The mashed potatoes should be getting lighter and creamy in texture, I almost want to say like consistency of a thick frosting. Spray muffin pans or liners with non-stick cooking spray and scoop mashed potatoes into cups. Place in preheated 425-450 degree oven and bake for bout 20-25 minutes. During the baking process, they begin to puff up a bit and then the browning begins, why, oh yes, it is looking like a mashed potato cupcake! Yep, who can't resist this? Oh, I know, my daughter.. face-->palm. Either way, I will try again, and that is what I did with the puffs. I added in some bacon bits and then rolled them in panko bread crumbs, hoping it would be like a tator tot. I also used a shortcut method and used instant (gasp!- I know, but they tasted good and had a great creamy texture) mashed potatoes. I put those little guys into the oven on a cookie sheet and baked them for similar temps as the others above, and it had great results. Either one of these will freeze well in order to make ahead for those upcoming parties, yeah timesaver! So what did the kiddo think? Ah, a little better reaction, but still no "I want to eat that again" mashed potato approval of the tough little cookie. So the search continues...

Round 1 - Mashed potato puffs - "cupcakes"
Round 2 - Mashed potato puffs - "tots"

I hope you enjoyed the crazy cooking challenge for this month on Tina's blog, and if you liked my blog entry, please vote for my recipe below and click on the like button. Also check out the others in their adventures in finding the yummiest mashed potato recipe! 

Photobucket

Thursday, November 3, 2011

funeral potatoes

Yummy note: The name of this dish, is well, really horrible. Funeral potatoes, really? I can't tell you how many times I've heard people call them this. I guess it isn't even a local Midwest thing, as I did a bit of googling on the name "funeral potatoes" and found this:  http://saltlakecity.about.com/od/lifestyles/a/FuneralPotatoes.htm   - wow, who knew. I mean, it totally makes sense to have this as a staple for big gatherings, especially when this casserole is so loved. So back to the point, yes, this is an ultimate comfort food dish, the cheesy, gooey, wonderfully crispy outside really takes the cake with this potato dish. I love this recipe, so I'm happy to share this with you all as well. I wish I could remember where I originally got this recipe, or who even gave it to me, but it has been one of those in my cookbook for years now... 


Funeral Potatoes
(aka Really Good Hash Brown Casserole)

Ingredients:
2 lb bag of hash brown chunks (or you can use a bag of potatoes o'brien)
3 oz cream cheese
1 can cream of mushroom soup (or you can use cheddar cheese, potato, or celery soup)
1/2 can of milk
1/2 stick of butter
1-2 cups shredded cheese
1-2 tsp. onion flakes
*optional - top with additional butter and crushed crackers, breadcrumbs, or potato chips for added crunch

Directions:
Preheat oven to 425 degrees. Spray a 9 x 13 pan with non-stick cooking spray. Mix soup, butter, cream cheese, and milk in a bowl and heat in the microwave until creamed (slightly melted) together. Put hash brown chunks into your 9 x 13 pan and pour the creamy mixture over the potatoes. Stir until mixed together. Add in onion flakes and half of the shredded cheese. After about 15-20 minutes into the bake time, stir mixture and add the rest of the cheese (and optional crumbs) on top. Bake for another 20-25 minutes, or until potatoes begin to get tender and cheese begins to brown.  Bake until until all cheese has melted and is a bubbly golden brown. Enjoy.


Before - All mixed up ready for oven. 
After - The crunchy, cheesy, gooey yummy potatoes revealed. 
Yummy note: You can decrease cooking time if you thaw hash brown chunks before hand. Also, if you put aluminum foil over the casserole while it is cooking, it also can help speed up some of the cook time. This recipe can easily be half-sized if you wish, but with a 9 x 13 pan, it is perfect for sharing with others.


This recipe is linked up to these great parties. This Chick Cooks, Miz Helen's Full Plate Thursday, It's a Keeper, A little Nosh: Tastetastic Thursday and The Lady Behind the Curtain Cast Party. Thanks!