Sunday, September 22, 2013

Peach Cobbler

Yummy note: This summer, the kids and I sure loved hitting all of the amazing farmer's markets around the area. They made me quite proud the other morning, when the farmer was asking them what each vegetable or fruit was, and my kiddos correctly answered about 80 percent of his questions right! My oldest could recognize zucchini, kale, squash, red bell peppers, and garlic; while my youngest identified melons, carrots, apples, and these amazing looking peaches. So we ended up with a bunch of peaches we found at the farmer's market, and I wasn't quite sure what we were going to do with them all at first, other then to just enjoy eating them fresh! Then came along the Secret Recipe Club assignment for the month of September. Well, hello and thank you to Liz from That Skinny Chick Can Bake, as she had some great peach recipes I could pick from to use them up on; like a Tomato Salad with Peach and Basil Vinaigrette or a Peach Upside Down Chiffon Cake. Then just recently Liz featured a Peach Galette. All great choices, I'm sure, but for some reason, I realized I've never really made a true cobbler before and this Peach Cobbler looked awesome. I've made various fruit crisps but not cobblers, and there is a real difference between the two in the topping category. The cobbler was more of a buttery biscuit like topping, while the crisps are more like an oatmeal cookie topping. Both equally delicious in their own rights! 

Peach Cobbler


Ingredients:
1 stick (1/2 cup) butter
1 cup of flour
1/4 tsp of salt
1 tbsp of baking powder
2 cups of sugar
1 cup of milk
6-8 peaches, peeled, pitted, and sliced - *See picture for easy peach prep techniques.
1 tbsp of fresh lemon juice
1 tsp of cinnamon


Directions:
Preheat oven to 375 degrees. Place butter in large baking baking dish and place in the oven to melt the butter. I used roughly a 9 x 9 baking dish and I think it was too small, as you will note some spillage in my photos.


So I would use a slightly larger one to prevent any loss of cobbler. Next prep your peaches. I used a simple method of slicing an "x" on the bottom of my peaches and placing in a pan of boiling water for roughly only 30 seconds. This helps release the peach skins, so that they peel off with ease. After placing peaches in the boiling water for only about 30 seconds, immediately place them in cool water to stop the heating process and then they will become cooler to touch and then peel the skins. After the skins are peeled cut the peaches into about 1/2 inch slices for the cobbler.


In a bowl, combine flour, 1 cup of sugar, baking powder, and salt. Stir in the milk, without over stirring, and pour over the melted butter.


Combine 1 cup of sugar, lemon juice, and peaches in a large pan over the stove. Cook over low heat, stirring constantly, until the sugar starts to dissolve and mixture becomes bubbly. Mix in some cinnamon to taste.


Pour over the cobbler batter, without stirring it together. Bake the cobbler (on a cookie sheet if you are concerned about spillage) for about 45 minutes or until it is a nice golden brown and the peach mixture below is hot and bubbly.


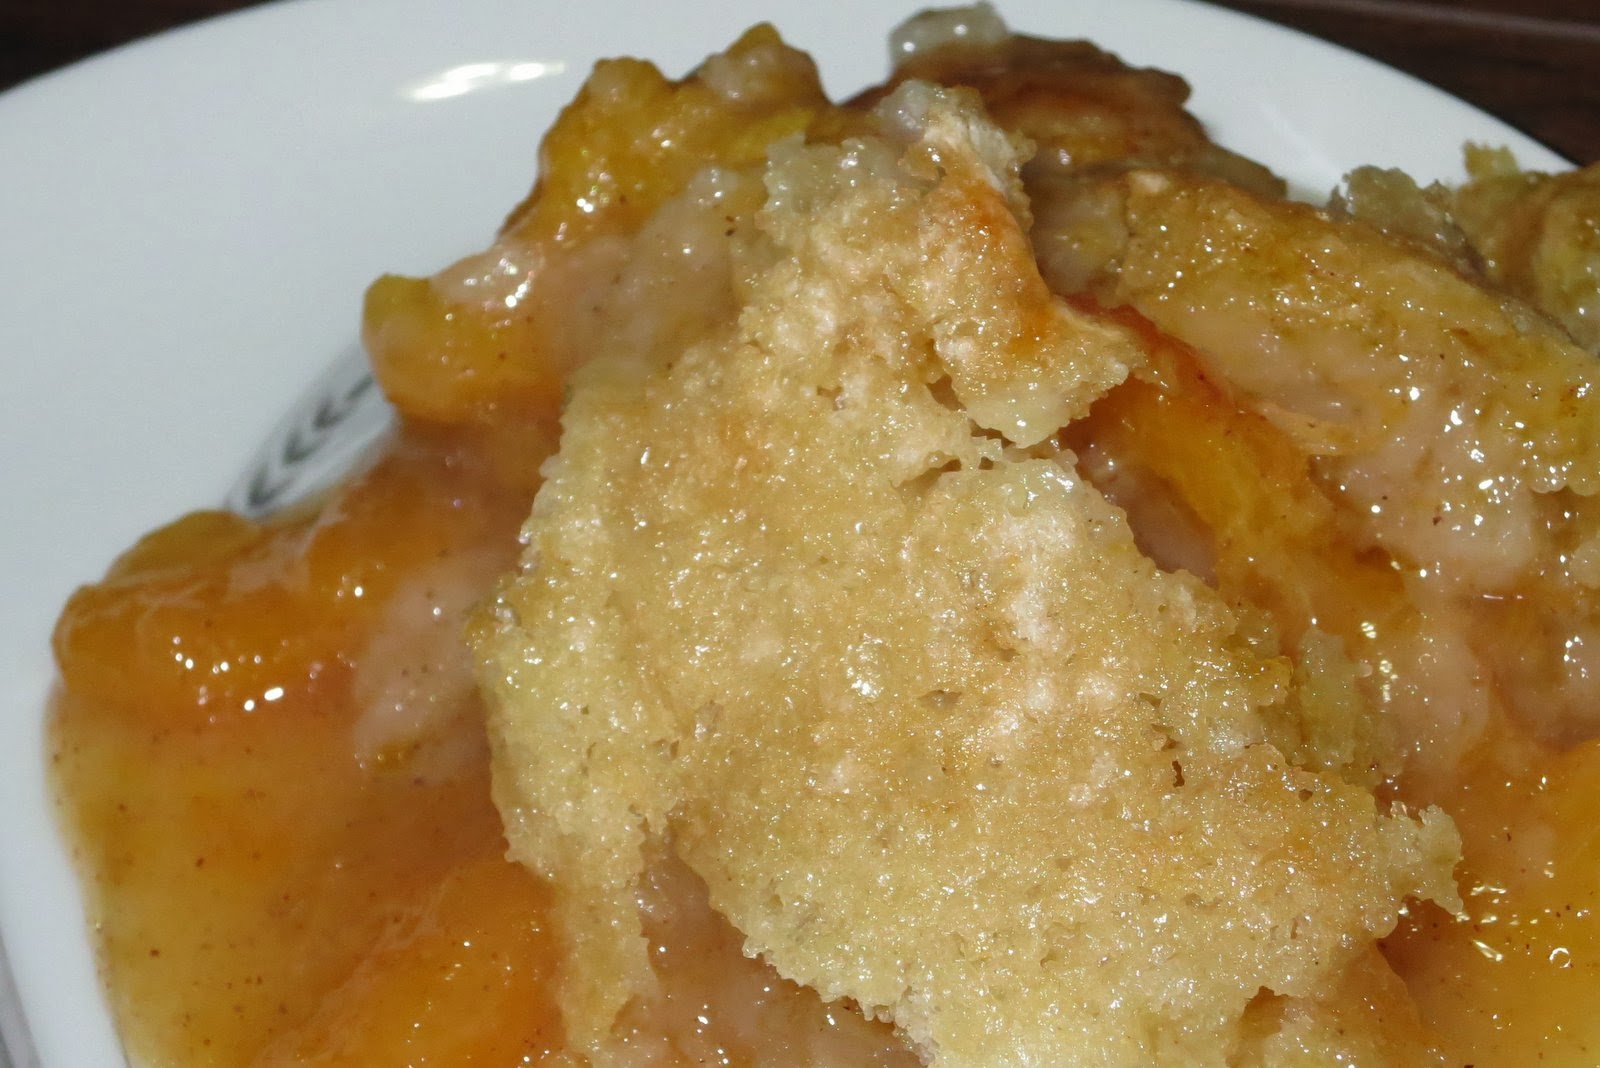
 After I cleaned up my overflow of peach cobbler, look at the beautiful golden brown crust.
 
A warm cobbler is the way to go... tender peaches and a slightly crunchy, gooey topping is the way to eat this cobbler! 


Monday, September 9, 2013

Watermelon Sorbet


Yummy note: Need a cold treat that isn't too sugary or sweet but tastes awesome! Not to mention it seems to be a hit with everyone? Watermelon sorbet is it! This dessert is a dairy-free, light and refreshing frosty treat. This watermelon sorbet also would work like a palate cleanser too as this sorbet is such a nice way to finish off a meal and it is pretty light. If you have a bunch of watermelon and need to use it up in different ways other than a fruit salad this is perfect. For an adult version, perhaps add in a little vodka to the watermelon mixture or make a cool cocktail.


Watermelon Sorbet

Ingredients:
3 cups watermelon, diced and seeds removed
1 cup sugar
1/2 cup water 
1/4 cup lime or lemon juice 
Chocolate chips, optional
Salt, optional
Watermelon rind, optional for presentation purposes


Directions:
Make simple syrup using the water and sugar. Do that by cooking the sugar, water, and juice together in a small saucepan. Simmer, stirring occasionally, until the sugar is dissolved. Remove simple syrup from the heat and cool. 

Prepare watermelon. Cut into cubes and remove the seeds (or use seedless watermelon which saves some time.)  Place watermelon in blender or food processor and process until smooth. Stir this into the chilled simple syrup. Cool the mixture if you wish, or pour directly into your ice ream maker. Process according to the ice cream maker instructions. My Cuisinart ice cream maker took bout 35-45 minutes of churning before it became scoop-able.  

You could also use this recipe without an ice cream maker by pouring the mixture into a shallow metal pan and freeing it. Every 30 minutes or so stir in the ice crystals that forming on the sides of the pan into the center. Repeat this process until the liquid all becomes icy and frozen. 


Serve with chocolate chips tossed on top to look like seeds for fun or sprinkle with a little sugar. You could also freeze it in the watermelon rind and serve it in a fun way. If you are one of those "need salt on watermelon" people, yes, you know who you are, haha.. This actually tastes pretty awesome with a sprinkle of salt, which brings out the intense watermelon flavor.


Sunday, August 18, 2013

Unicorn Poop Cookies

Yummy note: It was like Christmas in July for this month's Secret Recipe Club assignment time. Why? Well, with school starting up again here, I wanted to be able to pick out a fun kid-friendly recipe for this month with my kitchen helper shadows. I knew when I got my assignment, it was a perfect fit for us to pick from. The blogger I received was one that I have secretly stalked in the past few years! :o) Erin from Making Memories With Your Kids was the lucky recipient and she has such a fantastic site that features a bunch of recipes, to cutesy crafts, and fun activities to keep you and the family busy!  I had seen these Squigglers from her site a while back, and my kids enjoyed those guys here. Then last year, Erin made some brownies in eggs that my kids flipped over!  What a fun April Fool's Day treat we had with our friends! So I knew this time around, I had to find yet another amazing recipe to use. We thought of the Martian Cookies as we have home-grown zuchinni's coming out of our ears still with my little garden box producing plenty; but we were looking for some real hands-on fun. So I consulted my husband for his input too; he found the Play Doh Cookies, but I vetoed that and went a step above Play Doh Cookies for Unicorn Poop Cookies! Both had fun color, but when you can add sparkles and sprinkles and frosting, it is way better according to my daughter :) They could still play with their food (aka, cookie dough, which won my kids over. I think they enjoyed eating the cookie dough part more than making creations though! Thanks, Erin from Making Memories With Your Kids for such a fun post, as I made some great memories with my kids making these cookies!

Unicorn Poop Cookies 


Ingredients: 
1/2 cup of butter, softened (or we used a soy margarine for dairy-free option)
1/2 cup of margarine
1 cup of sugar
2 eggs
1 tsp of vanilla
2 1/2 cups of flour
1 tsp salt
1 tsp baking powder
Food coloring
sprinkles
pearl ball decorations
sparkling gel
Shimmery sugar dust/flakes


Directions: 
Cream together margarine, butter, and sugar. Add in the eggs and vanilla. Slowly add in your flour, salt, and baking powder; adding too much too fast results in a large cloud of flour dust. Trust me, on that one... Once the dry ingredients are mixed in, divide the dough into 5 or 6 smaller bowls. Add in a few drops of food coloring and stir into dough until well incorporated.


Chill the dough for about an hour so it is easier to handle and roll out into "snakes" or strips. Next sprinkle a little flour on your work surface so that the dough doesn't get sticky while rolling out your snakes. Erin suggested to make one long snake out of each color and then put the separate colors all together at the end to make one big combined color one. I think that plan would have been easier than what my kids decided to do. They each wanted their own snakes to play with while designing their cookies, so I went for it... This took considerably longer to create cookies, so I'm sure Erin's route from the beginning was much faster to do, as I ended up creating a larger snake once my kids were "done" making their creations and it was moving along much faster :) Either way, makes snakes and let the kids have a good time manipulating the dough into whatever colorful unicorn poop creation they'd like! So check out Making Memories With Your Kids for better visual of the creation of he larger snakes if you need!


Once your creations are ready to bake, place them in a preheated 400 degree oven for about 8 minutes. After you take the cookies from the oven, place the pearl balls into the cookies before they cool or else they will fall off. If the cookies are already too cool, just add them at the end after you put on the decorating gel or glaze. We made a quick vanilla glaze too, with just powdered sugar and a little bit of water.


So what was the review: I got a couple of "stinky p-u's" from my little guy who is 2 1/2, who thinks anything associated to the word "poop" means stinky or gross, but then retook his statement to "mommy, yummy" after he ate it :)  Then my older 7-year old daughter proclaimed that unicorn poop cookies are super cute and funny, especially when you can say the word "poop" and not get into trouble. :) Also, the cookie ingredient base is a pretty delicious tasting cookie, so if you are scared of all of the color, just try to make the cookies without the coloring to enjoy a soft, not too crumbly sugar cookie.


Sunday, July 21, 2013

Spinach Pasta with Bolognese Sauce


Yummy note: I feel that cooking is about having fun, trying new things, and getting your hands hands a little messy along the way. Sometimes I get in that never try anything new rut, and forget how exciting it is when you try a brand new recipe. That is why I love our Secret Recipe Club. This month I had Manu's Menu.  Manu's site has a wide variety of recipes on her site, ranging from regional Italian dishes, to cake pops and cookies, to her daughter's adorable birthday party treats. My favorite parts of Manu's site are in the techniques and tips sections. Seriously check her site out and bookmark it for later! You will want to make your own pasta after you see how easy it is; it is just one of those things you should do once in a while. 

My daughter and I had a free afternoon and it was perfectly open for making pasta. The weather could have cooperated a bit more with us, as it was a tad humid out, which seemed to take longer for our pasta to dry. Eh, either way, we had fun "squishing the dough" and "making noodles."  We let it dry out a bit before using it for supper and it worked, plus it gave us time to start our sauce for it. This Spinach Pasta with Bolognese Sauce was a hit. Everyone, yes, all 4 of us in our family, ate it and enjoyed it. I think part of it was due to the kids enjoyed having a hand in making the noodles for our supper and it was a "cool"-ness factor I think for making green noodles. This dish had great color! Then we topped these noodles with an amazing rich bolognese sauce as well. These recipes resulted in a double win-win!  I loved the chopped carrots in the bolognese as it added a slight sweetness to the dish, while the wine added more flavor depth than I have tried in some of my previous sauces.


Spinach Pasta with Bolognese Sauce


Spinach Pasta 
http://www.manusmenu.com/tips/techniques/pasta-and-gnocchi
under the Green Egg Pasta Dough portion


Ingredients:
5.25 ounces of fresh spinach
salt for seasoning
2-3 eggs (depending on how much moisture is in the dough)
10.5 ounces of flour (roughly about 2 or so cups)


Directions: 
Either follow Manu's directions here, or I happened to mix mine up in a blender. You need to wilt your spinach; all I did was throw it into a sauce pan with a little bit of salt and water and warmed it up for a few minutes, until it started to wilt. Cool the wilted spinach and squeeze out the water, getting out as much water as possible. Put the flour, wilted spinach, and eggs in a blender or food processor and mix. Once all ingredients are incorporated and looks crumbly, dump it out onto a floured surface and knead the pasta dough. It will take a few minutes, and you might need to adjust the consistency of the dough and add more flour, as the moisture from the spinach begins to incorporate into the dough. Do this process until you get a nice smooth dough and the spinach green color is prominent.  Roll into a ball and cover it with cling wrap and let it rest for 10-15 minutes. After the rest, roll out the dough and cut into smaller rectangular sheets to begin the passes through the pasta machine. NOTE: Manu has wonderful instructions here on how to prepare your dough and how to use it with your pasta machine, so I would check her site out here for instructions if you are new to pasta making. Once you have your thin sheets of pasta, send it through again to cut to desired noodles. Place cut noodles and gently separate into piles to dry.   

In the meantime you could begin your sauce for the noodles. I picked this awesome bolognese recipe from Manu's site to pair it with. However, if you don't care for red sauces, or your are looking for something quick with your pasta, check out this fairly simple dish using a tuna and ricotta


Bolognese Sauce 
http://www.manusmenu.com/tagliatelle-alla-bolognese

Ingredients: 
1 pound of ground beef 
1 stalk celery, finely chopped
1 carrot, finely chopped
1 onion, finely chopped
2 tbsp extra virgin olive oil
1/3 glass of good red wine
1 can of diced tomatoes (I happened to use a combination can of tomato and green chilies as that is what my kids and I accidentally opened and it still tasted great!)  
Salt and Pepper for seasoning
3 cups of water


Directions: 
In a large saucepan, drizzle in the olive oil and toss in the finely diced onion, carrot, and celery. Once they begin to soften a little, add in the ground beef. Stir well and continue to brown the meat.  Once the meat is brown, add the red wine and scrap off any bits stuck to the bottom of the pan and turn the heat up some to burn off the alcohol, leaving the flavor behind. Add the salt, pepper, can of tomatoes, and water.  Cover sauce and cook on low for about an hour. Keep the sauce simmering throughout this time. Stir occasionally. If it begins to thicken up too quick, you can turn the heat even lower and add in a little more water. Towards the end of your sauce time, you should start cooking your pasta, which didn't seem to take very long. Once again, Manu has a wonderful area set aside to just this, preparing pasta al dente. Spoon over your favorite pasta and top with a little cheese, if desired.   

Manu, thank you so much for sharing this recipe. Really, your nonna had to have been an amazing woman and cook, as this recipe took me to a little place of Italy without even leaving my kitchen! 

Thursday, July 11, 2013

Dry Rub for Pork

Yummy note: Summer is all about the grilling at our place, we love to grill, and try to grill out several times a week or as many times really that our schedule allows. We've been enjoying ribs and pork tenderloins more this summer since I've recently figured out how not to mess up pork and make it overly dry and yucky. Keeping pork moist is sometimes tricky, but I've found out that by using a dry rub on it, it helps keep the moisture in and adds lots of flavor. The kids have even liked this dry rub on the pork, as it is not too spicy, but has a nice, almost, sweeter barbecued flavor. 

Dry Rub for Pork


Ingredients: 
2 tablespoons of paprika
1 tablespoon of fresh ground pepper
1 tablespoon of garlic powder
1 tablespoon of onion powder
1/2 tablespoon to 1 tablespoon of chili powder, depending on how much heat you want to add
2 tablespoons of coarse salt
2 tablespoons of brown sugar or white sugar


Directions: 
Mix all of the above ingredients together in a bowl, mixing thoroughly. Store in a container until ready to use. This recipe can be easily doubled for larger batches of ribs or pork roasts. This recipe covers about 2-3 lbs of meat. To use, just liberally coat the meat of your choice. Then grill or bake in the oven until you've reached desired temperature. Check out this great reference link from Pork Be Inspired for grilling/cooking time for various cuts of pork. 


Pork Tenderloin with Dry Rub 

Juicy pork on the inside, with a nice caramelized brown crust.

Dry Rub on BBQ Ribs


This dry rub makes great flavorful coated pork for tacos or burritos.

Sunday, June 16, 2013

Peanut Butter Fudge

Yummy note: Peanut butter, oh how I love thee. It is kind of like a bad word though around my house, as my daughter has a nut allergy. Luckily it is not so severe, that we can still have peanut butter in our house, whew, I can still get my peanut butter fix. So when I saw this Peanut Butter Fudge recipe on my Secret Recipe Club friend's site this month, I had to try it. Fudge consistency is huge for me, I really don't care for the super creamy fudges, so when Veronica from My Catholic Kitchen described it as "This fudge is like the inside of those eggs you get for Easter." I knew this recipe might just be what I was looking for... Actually I think it tastes very similar to that of a another recipe I almost made of Veronica's here called a buckeye. Both equally delicious, thanks Veronica. Make sure you stop by My Catholic Kitchen's blog for some inspiration and wonderful recipes. 


Peanut Butter Fudge 


Ingredients:
5 ounces of unsalted butter
2/3 cup smooth peanut butter
1/2 teaspoon salt
(Don't leave this out! It adds to the nice nutty flavor)
1 1/2 teaspoons vanilla
2 1/4 cups powdered sugar

Directions: 
In a small pan, melt butter and peanut butter together and then bring to a boil on high. (Alternatively, I also made this in the microwave too! In a microwaveable bowl, place butter and peanut butter and cover with plastic wrap. Microwave on high for about 1 1/2- 2 minutes.  Next stir mixture and microwave another 2 minutes, mixture will be hot and bubbly!) 


Remove pan from the heat after mixture starts boiling. Add in vanilla and salt. 


Stir in powdered sugar until smooth. Note the mixture starts to get really thick here! So stir it with some muscle to incorporate the powdered sugar well. ;-)  


Put the fudge into a 9 x 9 pan lined with parchment paper for easier removal. Allow to cool and store in the refrigerator until to cut into pieces and enjoy. 


Note: So I must admit, I tried this recipe out using a different type of peanut butter first. Like I said before I love peanut butter, so I have several types always in my cabinet. I have this one called PB2, which is a powdered peanut butter. It truly has a great fresh taste when you prepare the peanut butter, however it's make up is a bit different, it has less fat than the regular peanut butter, so the fudge did not turn out with the best consistency. However, it tasted really good, so I couldn't let it go to waste... so I dipped it in chocolate and made some chocolate covered peanut butter treats out of them instead. :) 


Have fun checking out the others in the Secret Recipe Club group C as they make some amazing culinary treats! 

Monday, June 10, 2013

Lemon Meringue Bars


Yummy note:
The other night I was hungry for lemon meringue pie, but really didn't want to make a whole big pie. For some reason, no one else really would probably eat the pie with me in my house and I'd have to eat the entire thing! So I opted to make a different variety of the lemon meringue pie by converting it into bars. I had the same flavors as if it was in the pie format-- a graham cracker buttery crust, tart lemony pie filling, and of course, ooey, gooey roasted marshmallow meringue-like topping. The bar format wasn't exactly portable, as I had to use a fork for a few of the times I ate them, but it was still really tasty, not to mention easy to throw together. So Lemon Meringue Bars were born. This was one of those late night creations I made, so I unfortunately didn't have a ton of pictures to go. Enjoy this summery treat. 


Lemon Meringue Bars 


Ingredients:
Crust: 
1 1/2 cups graham cracker crumbs
6 tablespoons butter, melted
4 tablespoons sugar

Filling: 
1 can of Lemon Pie Filling

Topping: 
about 2-3 cups of mini marshmallows 
(or enough to just give it a nice even single layer across the pie filling)


Directions:
Mix crust ingredients together and press in the bottom of an 8x8 inch pan that has been sprayed or lined with parchment paper for easy removal of the bars.  Bake at 350 for maybe 5-8 minutes just enough to start to set up the graham cracker crust. Pour over the can of lemon pie filling and place marshmallows on top to completely cover the lemon filling. Bake again for another 10-15 minutes or until marshmallows start to get a golden brown color. If the oven is not turning it to the golden brown you'd like, you could also put it in the boiler for a few minutes to speed up the process. Next, set aside and chill the lemon meringue bars before cutting.