Pages

Sunday, February 26, 2012

Black Bean and Corn Salsa

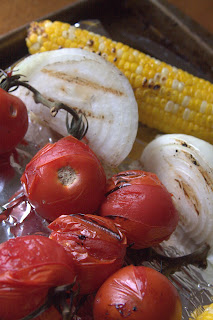
Yummy note: So continuing with my Sentimental Sunday series, I've found a recipe of mine that I was shocked I haven't blogged about yet. I have made it for countless gatherings as it is one of my old staple favorites. Many of my friends have been asking and telling me "I can't find that recipe on your site anywhere.." yikes! So I went looking back and found these great pics to go along with this recipe. I had taken them last summer, maybe early fall, as our little family hit up a local u-pick farm. They had some great peppers there, so we used them in this salsa. What is great about this black bean and corn salsa recipe, you don't need to have fresh ingredients for it to taste fantastic. A few canned or even frozen ingredients with a few fresh ingredients goes a long way to make a delicious quick salsa.

Black Bean and Corn Salsa

Ingredients:
about 1-2 lbs fresh tomatoes*
half of an onion, diced
minced garlic
can of seasoned black beans
couple of ears of corn on cob*
one or two peppers, diced*
handful of fresh cilantro, chopped
lime juice, from about half of a lime
salt to seasonings

*Yummy note: If fresh corn on the cob is not available, use a can or frozen mix of the Mexican corn or Southwest corn. If you do not have tomatoes to roast, a can of diced fire roasted tomatoes cuts down the prep time considerably. Also, the fire roasted red peppers in a jar are a good substitute as well.
Don't be afraid to substitute fresh with a canned or frozen variety in this recipe! It will help cut down your prep time and the salsa will come together faster.
Directions:
If using the fresh ingredients, like the corn on the cob, tomatoes, onion, and peppers, toss them on a grill or place in the oven or stovetop and roast them a bit, along with the tomatoes and onion. Once cooled, cut the corn off cob, dice the onion, peppers, and tomatoes. 


In a large bowl, toss all of your ingredients together. Then add in a handful or so of chopped fresh cilantro and about a tablespoon of minced garlic. Squeeze in fresh lime juice. Finally, toss in drained seasoned black beans. Taste your salsa and season it with salt accordingly. Chill salsa for atleast an hour before enjoying and serve with tortilla chips.


Here's some pics of the kids at the farm getting ready to find our good eats! We hit up a Chicagoland area u-pick farm called Garden Patch Farms, where we had a good time finding out where some of our food comes from.


Tuesday, February 21, 2012

baked doughnuts

Yummy note: In honor of Fat Tuesday, also known now as Packzi day to me, I've decided to post about the closest thing to it... doughnuts! I first learned about this Packzi day about 10 years ago at my first job in Chicagoland where my boss brought us in a couple dozen of these gems from a local bakery. And who knew this was how you pronounce it...  Anyhow, it has become a new favorite food day for me. Recently a friend picked me up some Wilton doughnut pans and I whipped up a batch of little baked doughnuts. If you are not about the baked variety of doughnuts, and want to go straight to the deep-fried goodness, check out my other family favorite with this fried donut recipe.

Baked Doughnuts


Original recipe from the Wilton Doughnut Pan packaging below


Ingredients:
2 cups cake flour, sifted
3/4 cup white sugar
2 tsp baking powder
1/4 tsp ground nutmeg
1 tsp salt
3/4 cup buttermilk (I substituted this with Greek yogurt)
2 eggs, lightly beaten
2 tbsp butter, melted


Directions:
Preheat oven to 425 degrees. Spray doughnut pan with nonstick cooking spray. In a large bowl, sift together cake flour, sugar, baking powder, nutmeg, and salt. Add in eggs, butter, and yogurt. Mix until just combined. Pour into doughnut pans, roughly filling each doughnut cavity about 2/3 full. An easy tip to transferring the dough into the pan is to place the dough into a plastic bag or decorating bag and pipe into your pans.


Bake doughnuts for about 7-9 minutes or until the top of the doughnuts start to brown a bit and spring back when they are touched. Let cool in pan for about 4-5 minutes and remove. Finish doughnuts with your choice of toppings or fillings.

Chocolate Glaze:
1/4 cup chocolate chips
1 tbsp corn syrup
1 tbsp butter
1 tsp water


Directions: 
Melt chocolate chips, butter, and corn syrup for about a minute or until completely melted. Stir in a tablespoon on the hot water until the glaze becomes smooth. Add more water if consistency is not to your liking. Dip doughnuts immediately and let the chocolate glaze set.


OR

Vanilla Glaze:
1 cup powdered sugar
couple tbsp water or milk
splash of vanilla extract

Directions:
Put powdered sugar in a bowl and add gradually your choice of either water or milk and stir. Just a few teaspoons or perhaps a tablespoon might be enough. Add in a splash of vanilla extract for added flavor at the end when you reach your consistency of the vanilla glaze. Frost doughnuts as desired.


Add your finishing touches at the end before the glaze sets up. Sprinkles, colored sugar, or even plain powdered sugar or cinnamon sugar works well. Be creative!

Aren't they just cute?! I love them.. just so much bite-sized goodness.

And in honor of Packzi Day, here's a few filled with some strawberry jelly and one with some vanilla pudding. (I just used one of the kids vanilla pudding cups from the refrigerator and it worked great!)


Ode to my Packzi, the filled donuts of Fat Tuesday...
These were my treat of the day from one of my favorite local bakeries, Deerfields

Friday, February 17, 2012

herbed baguette appetizer

Yummy note: This Christmas, I received a "fun" gift, we shall say.. well, it was more of a challenge... 


My husband's brother and wife had our name in the gift exchange and decided to have some fun with us. They knew I had just gotten a new Kitchen Aid mixer for Christmas, (I know, yeah! finally! I've been wanting one for several years now and I finally got one, thanks to some awesome after Thanksgiving deals.) So Tony and Michelle decided to present us with a cooking challenge gift to use and inside this gift, it included various things that I needed to incorporate to make something delicious. Oh, and I couldn't do any crazy internet searching or googling all of the ingredients in one search. Plus, if I gave up and couldn't find anything and decided to open their findings in the sealed envelope, I'd have to give in to some crazy demands, like wearing a Bears' football shirt, so yeah, uh, hmh, no thanks, I'll start getting creative here. lol. I think my husband thanks me to, as he would have had to wear a Packers' shirt as well. And just to be straight, I like the Green Bay Packers, and he likes the Chicago Bears, so it is a mix of fun in our house during football season. 


The secret ingredient gift box below included:
Natural Sea Salt - Rubbed Sage - Blackberry Preserves - Kitchen Aid Mixer Bowl Lids 


So in essence of one of my other initiatives this year for my blog, I wanted to start cooking and baking more out of real books, cookbooks, or magazines. So I went straight for the heart of the beast, and started looking into my Kitchen Aid Mixer manual book that I just got. 
Initially, before I went looking into my books, I was thinking of doing a stuffed chicken breast type of dish, and stuffing the chicken breast with a cream cheese or cheese and herb mixture and making a glaze or a finishing sauce to tie it all together. But then when I saw this baguette recipe, I knew I could pull it all together and make a yummy little appetizer or well, eat enough of them and it becomes a main dish ;)  which I think we ended up doing, as the flavors were nice together. So here's my results for the Great Cooking Challenge of Christmas 2011-- it's an herbed baguette with chicken topped with a blackberry glaze. 


Herbed Baguette Appetizer 

Original baguette recipe from my KitchenAid mixer manual page 71. http://www.kitchenaid.ca/assets/pdfs/literature/Use%20and%20Care%20Guide%20-%209708307.pdf

Ingredients: 
1 package active dry yeast (or 2 1/4 tsp equivalent)
1 tsp sugar
1/4 cup warm water (105-115 degrees F)
3 1/4 - 3 1/2 cups all-purpose flour
1/2 tsp dried basil
1/2 tsp dried oregano
1/2 tsp dried thyme
1 tsp rubbed sage
1 tsp minced garlic
1 tsp sea salt
3/4 cup cold water
1 egg
1 tsp water

Additional ingredients: 
couple of cooked chicken breasts
1 jar of blackberry preserves

Directions: 
Dissolve yeast and sugar in 1/4 cup of the water in a small bowl. Place 3 1/4 cups flour, along with the herbs and salt, into a bowl. I mixed the dry ingredients using my dough hook in my mixer, roughly about 30 seconds to begin incorporating ingredients. Slowly add the bubbly yeast mixture and additional 3/4 cup of cold water, mixing about 30 seconds. Once dough starts to become sticky, add remaining 1/4 cup of flour. Continue to mix/knead in the mixer on low speed for about 3 minutes or until dough is smooth and elastic. Place dough in greased bowl, and cover. I used my new handy dandy lids for this :) Let the dough rise in a warm place for about 1 1/2 to 2 hours, or until doubled in size.


Next, on a lightly floured surface, punch dough down several times to remove air bubbles, and divide the dough in half. Shape each half into a 12" long loaf, and place on a greased baking sheet. With sharp knife, make 3 to 4 shallow diagonal slices in top of dough. Beat egg and 1 teaspoon water together with a fork. Brush each baguette with egg mixture. Reserve any leftover egg mixture for later. Cover with greased plastic wrap and let rise in warm place, free from draft, for about another 1 to 1 1/2 hours or until doubled again.


When the dough is ready, brush top of each baguette again with the leftover egg mixture.  Bake the two loaves in a preheated 450 degree oven for about 15-18 minutes or until deep golden brown. Remove from pan and cool on wire racks.

To assemble the appetizer, prepare some cooked lightly seasoned chicken breasts and slice thinly. Heat and reduce down some (maybe half of the jar) of the blackberry preserves to make a nice smooth flavorful glaze. I added just a small amount of water, maybe a teaspoon to the preserves to get it more of the consistency i wanted, but by just heating the preserves up, it breaks down nicely to a glaze. Assemble by cutting your herbed baguette in thin slices, and top with a slice of the chicken breast. Finish with a drizzle of your blackberry glaze and enjoy.


The kids enjoyed the baguettes with the glaze alot, while I devoured the appetizers, which later I think my husband and I turned them into mini sandwiches and topped the chicken and glaze with another slice of baguette. Delicious. Thank you Tony and Michelle for not making Drew and I wear any crazy football attire during this challenge and for pushing my culinary experiences! 

Tuesday, February 14, 2012

Heart-Shaped Crayons

Yummy note: Initially I wasn't intending on blogging about this fun craft I did with the kids, but it got such rave reviews from Alicia, I figured it was worth a post. Alicia is really into the Valentine's day theme the last few days, especially since her kindergarten class has been talking about their Valentine's day party for like the last week. We just got all of her Valentine's finished up and I decided to do a fun craft with her. I started the unwrapping project earlier in the morning and waited until she got home from school to pop them into the oven so she could help with that part. We decided to "mix" it up a bit!  We used some of our old crayons and made some new fun heart-shaped ones instead! It was such a fun way to get rid of all those pieces and recycle all of those old crayons. Check out a few of the links below for more information on how to create your own heart-shaped crayons! Happy Valentine's Day! 
http://familyfun.go.com/crafts/crayon-hearts-671639/ or http://www.ehow.com/how_2125332_make-heart-shaped-crayons.html


Heart-Shaped Crayons

Directions: 
First, make sure all of the paper wrappers are removed from your crayon pieces. An x-acto knife works well to cut a slit into each crayon wrapper for easier removal, just be careful not to let the kiddos help with this part. Place unwrapped crayon pieces into a pan of choice size and shape. I used a cheap silicon one I found in the dollar section of the Target store actually. Just note, I've heard that baking crayon pieces may ruin your pan, so please don't use your best pans to do this in, just in case the wax from the crayons can not be removed. 

Before


Bake in a 200 degree oven for about 10-15 minutes. Just make sure to periodically check on them, as some batches are quicker than others depending on the sizes of crayon. Remove them from the oven and let them cool completely before removing them or else they might break or not set properly. Once cool, peel them out of the pan.


After

Alicia was stacking her newly finished crayons. She was pretty excited with how "cool" they looked. 


Ben working on breaking some more crayons for us for future use :P  lol.. he's just learning now, not to eat the crayons. :)

Monday, February 13, 2012

No Knead Bread

Yummy note: Let me first state, I love bread. I do not own a bread machine, as I think the fun part about bread is the kneading it and getting your hands messy. I enjoy the hand care that goes into something, such as when you bake at home, maybe I'm a bit old-fashioned when it comes to that, so if I have a chance and time allows it, I will make a loaf of bread. Well, what happens when you have a no knead bread, where the bread just kind of hangs out all day? I think it felt neglected, lol, compared to other bread doughs I've made in my kitchen. haha.. but it did all right. Pretty good, actually... The bread recipe I used was from Amy and Zach's blog originally called Adventures in Marriage, but it appears they just recently renamed it to What's Brewing in the Kitchen. By the way, what cute blog wallpaper they have on their site as well.. wink, wink... ;)  So this no knead bread was my recipe of choice with the Secret Recipe Club. This bread ended up becoming this nice crispy crunchy hard crust on the outside and soft, yet just a little chewiness on the inside. This no knead bread was great for toast, french toast, sandwiches, and of course, croutons when it got to be closer towards the end of its shelf life. Next time I can't wait to try this recipe of Amy and Zach's with the bread - a nice bowl of corn chowder!  So my husband and I really liked this bread, and the texture was tender and delicious.  However, when I made the kids their grilled cheese with it, I got the "this isn't the same white bread" remark, as I was suspiciously trying to mask this new bread with gooey cheese. I thought it made a darn yummy grilled cheese, too bad she didn't... oh, the woes of a 5 year old. So, what are you waiting for, and try a hand at this easy recipe, just be prepared to be a little patient to get the results from this yummy bread. 


No Knead Bread

Ingredients: 
3 cups all-purpose or bread flour, more for dusting (I did a mix, but I'm sure you could experiment with the proportions to get different results.)
1/4 tsp instant yeast
1 1/4 tsp salt
1 1/2 cups water

Directions: 
In a large bowl, stir the flour, yeast, and salt together. Add water and stir until blended. Dough will  become sticky and what Amy called "shaggy."  Cover the bowl with plastic wrap. Then this is the hard part... let the dough rest AT LEAST 12 hours, preferably about 18 hours, at room temperature. 


After 12 hours, you could perhaps peek at the dough and see what it looks like. The dough should be fine to use, once it is looking more airy and you can visibly see some bubbles or bubble-like formations towards the top. Lightly flour a board or area, and place your wet sticky dough on it.  Sprinkle your mass of dough with a little more flour and fold it over on itself once or twice, just so it deflates a bit. Then cover loosely with plastic wrap or a clean kitchen towel and let it rest about 15 minutes.


Next, add a bit more flour to keep the dough from sticking to the work surface or to your fingers, and gently and quickly shape the blob of dough into a ball shape. Sprinkle with flour, and cover again with your towel or plastic wrap, and let it rest once again for another 1-2 hours. Halfway through this rise, check the note below about preheating your oven. The dough is ready once it is doubled in size. 


While bread is in the last rise, preheat your oven to 450 degrees and put a 6-8 quart heavy covered pot (like a cast iron, Pyrex, or ceramic pot) in oven as it heats up. After the dough has finished with the last rise, carefully remove the hot pot from oven. Tip dough over into the pot and cover with lid and bake 30 minutes. 


Then remove the lid and bake another 15 to 30 minutes, until loaf is a golden brown. I added on a few dots of butter at the last few minutes also to create more of a golden color and buttery top of my bread, too. (This is optional though.) Cool on a rack before cutting.


Check out all of the other wonderful posts in this month's Secret Recipe Club!  


Tuesday, February 7, 2012

egg and dairy-free chocolate cake

Yummy note: So my little man turned 1 this month, and I was on a mission to find a dairy-free cake for him. Ben has had some sensitivities to dairy the last few months since we tried introducing it into his diet, so I knew I needed to find him a dairy-free treat to make. Check out his recipe approval pictures below... :)  I wanted to make him a smash cake for his birthday party, so when I saw this recipe on two fellow blogger sites (both from the Secret Recipe Club), Deeba and Barbara, I knew I had to bookmark it for later to try... and timing was perfect. Tina at Mom's Crazy Cooking Challenge sent out this email for the ultimate chocolate cake challenge for the month of February. I knew it was meant to be... I hope you enjoy this egg and dairy-free chocolate cake as much as we did, as the taste was amazing. You would not know that you were missing any of the eggs, butter, or milk in this cake, as the flavor was superb and the texture was moist and almost fudge-like. Next time I might try replacing some of the oil with applesauce, or perhaps more mashed bananas, but overall this allergy-friendly cake rocks.... 


Egg and Dairy-Free Chocolate Cake
Thank you to Barbara from Barbara Bakes and Deeba at Passionate about Baking for this egg and dairy-free recipe.


Ingredients:
1 1/2 cups all-purpose flour
2 tablespoons less of 1 cup sugar (about 16 tablespoons)
1/4 cup unsweetened cocoa powder
1 teaspoon baking soda
1/2 teaspoon salt
1 cup hot water
6 tablespoons vegetable oil
1 tablespoon apple cider vinegar
1/2 tablespoon vanilla extract

*Yummy note: This recipe is halved, but can be easily doubled to the original recipe proportions as done on Deeba and Barbara's sites.


Directions: 
Preheat oven to 350ยบ with rack in the center. Spray one 9 inch round cake pan (I ended up using 3 mini springform pans instead) with non-stick spray. Whisk together flour, sugar, cocoa, baking soda, and salt in a large mixing bowl by hand.

In a large measuring cup or small bowl, combine hot water, vegetable oil, vinegar, and vanilla. Pour liquid ingredients into the dry ingredients and whisk just until combined.


It can be a bit lumpy still, don't overmix.


Divide cake batter between pans or pour into the one 9 inch pan. Bake for about 20 or so minutes if using smaller pans or 35-40 minutes if using a larger pan.


Test cake to see if it is done by inserting a toothpick into the center and see if it comes out clean. Cool cake in the pan sitting on a rack for about 15 minutes, then invert them onto the rack to cool completely.


I frosted this cake with dairy-free chocolate banana frosting and added in sliced bananas.


Dairy-free chocolate frosting

Ingredients:
1/4 cup Crisco, melted
1/2 cup cocoa
1/4 teaspoon salt
1/3 cup mashed bananas
1-1/2 teaspoons vanilla
3-1/2 cups powdered sugar, sifted
1-2 tbsp water, if needed

*Yummy note: Original recipe called for 1/3 cup of milk instead of the mashed bananas, so if you do not need to make it dairy-free you may opt for this instead. Either way, it is delicious.


Directions:
In a saucepan, melt Crisco. Remove from heat after melting and add cocoa and salt. Stir in vanilla. Alternate adding in the mashed bananas and powdered sugar. Keep adding in all of the bananas and powdered sugar until incorporated. Add in a few tablespoons of water if needed to achieve a smooth and creamy consistency.


To assemble cake, cut cake into even layers and add in sliced bananas between thin layers of your chocolate banana frosting. Assemble and top with more frosting and sprinkle with chocolate chips. Note many chocolate chips are NOT dairy-free, so be sure to watch labels.


Happy Golden 1st birthday on the 1st of February, Ben. 


Check out all of the others and their chocolate cake challenge!

Photobucket