Sunday, December 9, 2012

Asian Lettuce Wraps

Yummy note:  I have enjoyed an Asian flair lately in my cooking. Usually once a week now, in my meal plans I have started to incorporate an Asian night. I'm not sure if it is the easy to toss ingredients together to make something delicious, or if it is healthier, or perhaps it has to do with it is really easy to make dairy-free for my family. I find these Asian Lettuce Wraps great to make as a main meal dish. They are fairly quick to make and I often have almost all of the staple ingredients in my cabinet which makes for an affordable meal. I hope you enjoy these lettuce wraps as much as we do.


Lettuce Wraps


Ingredients:
a head of lettuce (or about 10 lettuce leafs)
1 lb ground turkey, beef, or chicken
a handful or about a cup of shredded carrots (optional)
about a cup of diced mushrooms
1/2 white onion-chopped (I often use dried onion flakes or powder if not available)
2 tbsp garlic minced
1 small can water chestnuts, chopped
1 tbsp red pepper flakes
1-2 tbsp soy sauce
1 tbsp vegetable or sesame oil
1/4 cup hoisin sauce
handful of thin sliced green onions, optional


Directions:  
Brown the meat. Then add in onion, garlic, shredded carrots, water chestnuts, soy sauce, vinegar, and red chili pepper flakes.  

After the carrots and mushrooms begin to soften, add in hoisin sauce, green onions, and extra oil if needed. Cook until mixed together and green onions begin to wilt, just for a few minutes really.

Serve in large lettuce leafs like a wrap or serve in a tortilla shell too if you wish. 
To garnish you can also add in fried thin rice noodles to the top. 

Monday, November 12, 2012

Chocolate Cupcakes

Yummy note: When I got this month's Secret Recipe Club assignment, I took a lot of time looking at Sarah's wonderful blog named Sarah's Kitchen.  Many of the recipes she posted are straightforward and pretty good-looking comfort foods that I could see eating night after night. I am sure her husband, Randal, that she blogs about quite frequently, really gets some great eats! Despite some wonderful main dish recipes that I've bookmarked, I keep seeing beautiful cupcakes... and well, more beautiful cupcakes taunting me.. Sarah, congrats, you had me at cupcake. It was like I shut my eyes, and saw these awesome pictures of cupcakes all lined up, with fluffy frosting, yummy and tasty looking. So enough of the gawking, I had to dive right in, and try it out myself. I really had a hard time picking, I really wanted to make these Salted Caramel Mocha brownie ones, but then I thought about these Caramel ones, and finally I came to a realization I can't eat all these cupcakes myself.... So in typical It's Yummy to My Tummy fashion, I got my non-dairy thinking cap on and decided to think rational and pick a cupcake recipe that had the best options to make dairy-free. These chocolate biscoff ones seemed appropriate  Plus, anytime I can use biscoff spread, count me in. 


Chocolate Cupcakes
Recipe with adaptions from: 
http://sarahsbritamericankitchen.blogspot.com/2012/05/chocolate-cupcakes-with-biscoff.html


Dairy-Free Chocolate Cupcakes 

Ingredients: 
3/4 cup plus 2 tbsp all-purpose flour
6 tbsp cocoa powder
1 tsp baking soda
1/2 tsp baking powder
1/2 tsp salt
1 cup sugar
1/4 cup vegetable oil
1 large egg
1/2 cup coffee
1/2 cup soy yogurt 
1 1/2 tsp vanilla extract


Directions: 
Combine the flour, cocoa powder, baking soda, baking powder, and salt and set aside. In a separate mixing bowl, cream sugar, vegetable oil, and egg until smooth, for just a few minutes. On low speed, blend in half of the dry ingredients until incorporated. Next, blend in the coffee, yogurt, and vanilla. Add in the remaining dry ingredients, and mix until just incorporated. Using an ice cream scoop, evenly distribute into cupcake wrappers. Bake at 350 for about 22-24 minutes. Makes 12 cupcakes. 


Biscoff Frosting

Ingredients:
1 cup butter substitute, softened
3/4 cup biscoff spread
1 tbsp vanilla extract
3 cups powdered sugar
3 tbsp soy milk or soy creamer


Directions:
Beat the butter substitute and biscoff spread until smooth.  Add the vanilla and powdered sugar and mix until combined.  Add in some soy milk and beat until it is creamy and combined well. 


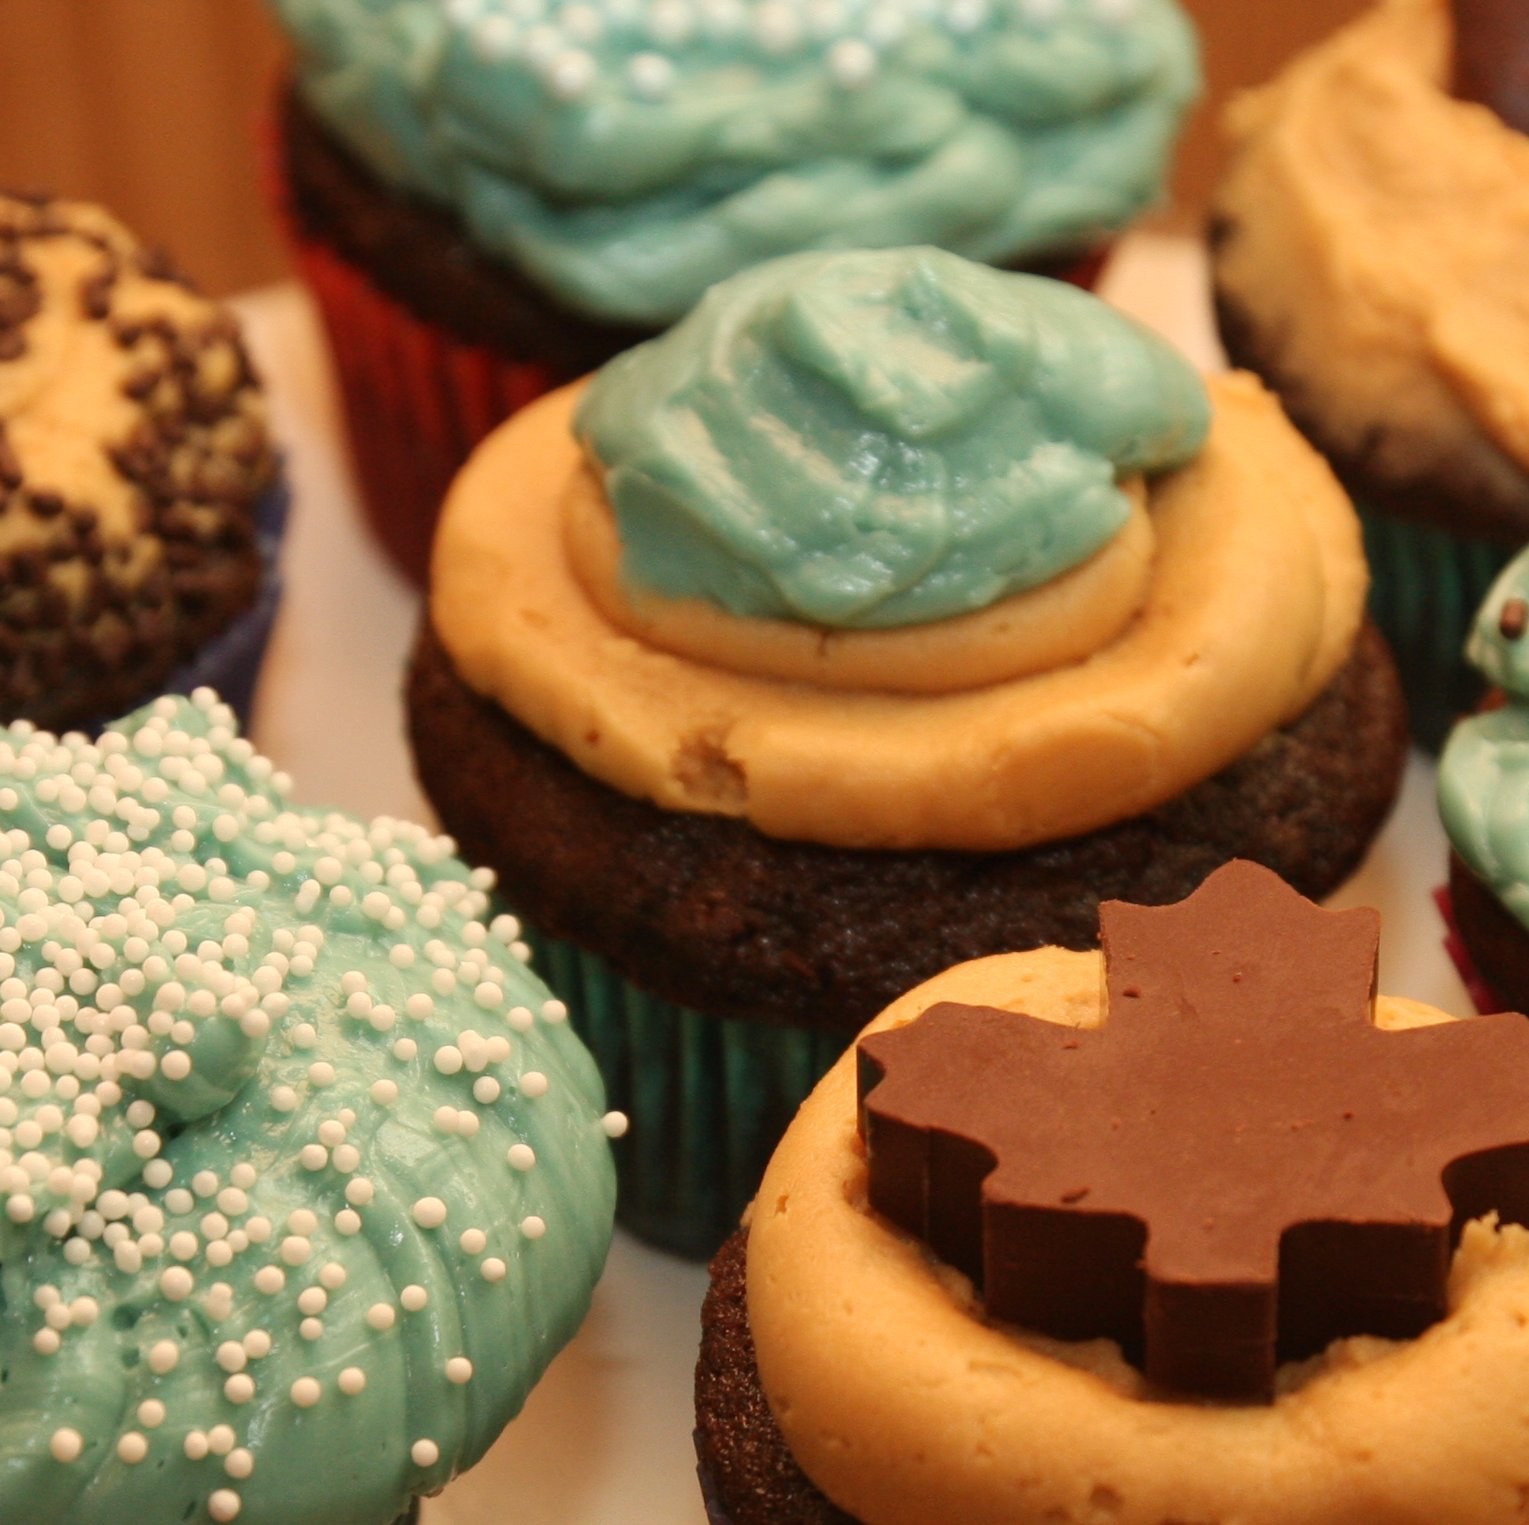
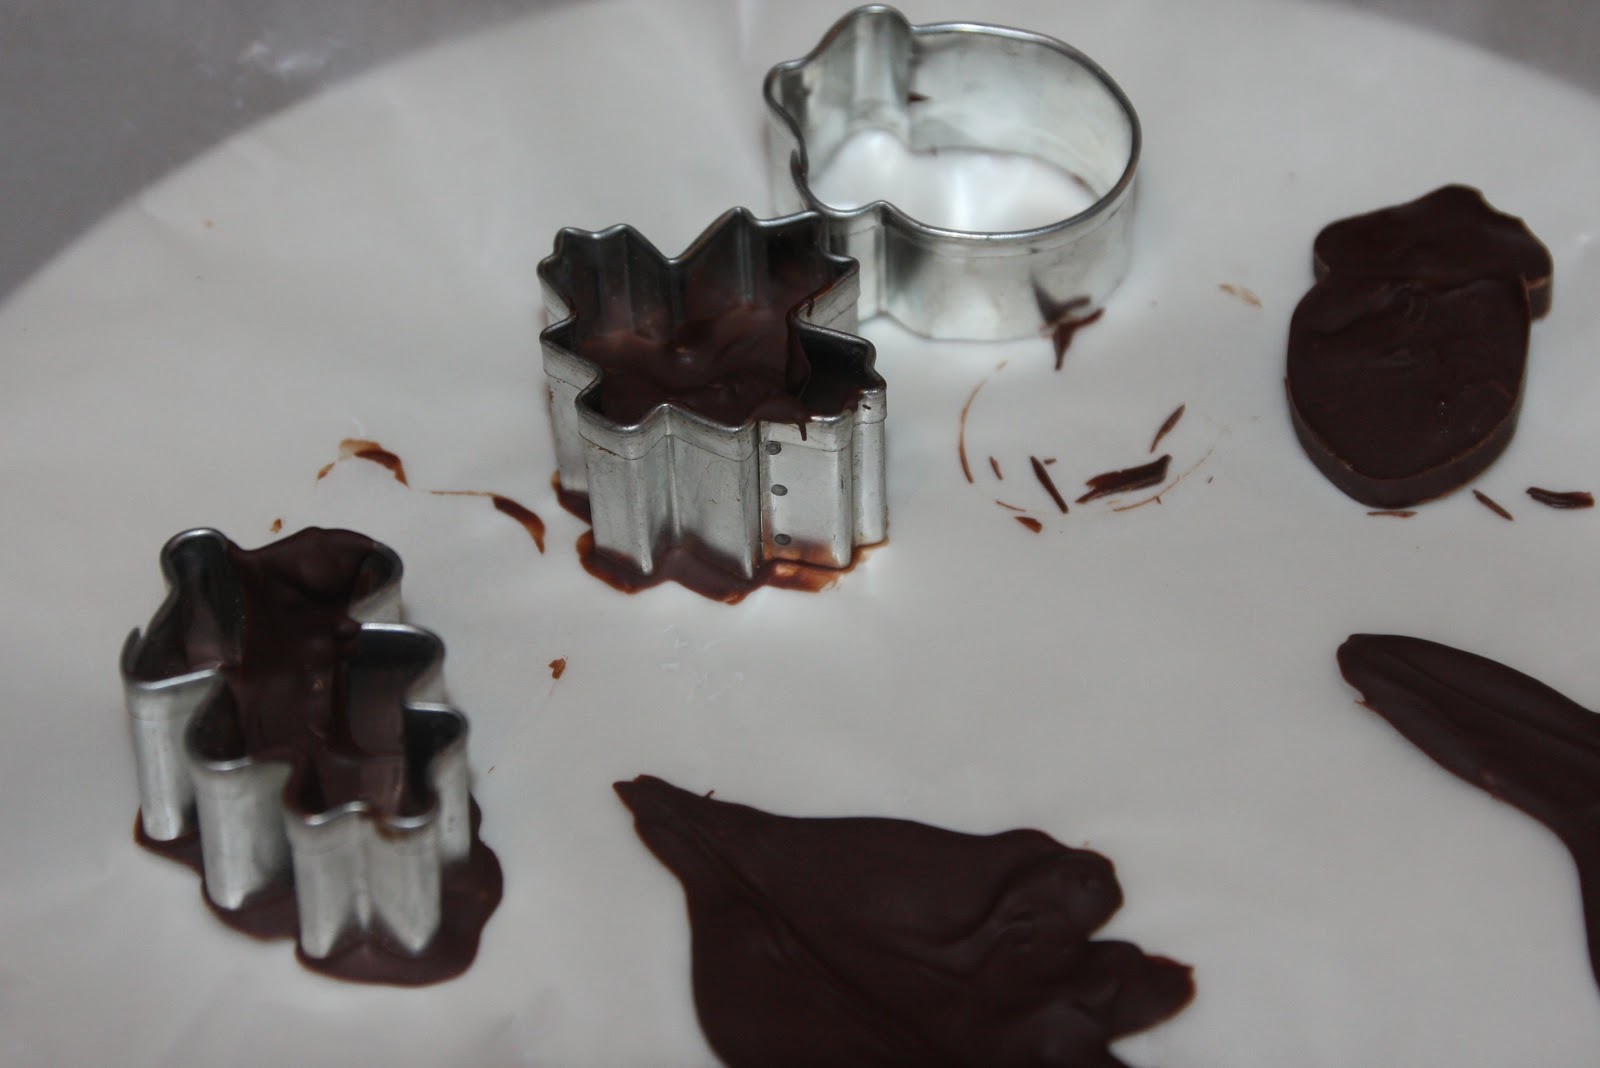
To make some decorations, I just melted about a cup or so of non-dairy chocolate chips with a teaspoon of shortening together. Then I poured the melted chocolate into mini cookie cutters to set. Then you push out the chocolate when set and you have pretty cut-out chocolates to decorate cupcakes with. 


I need some serious help or therapy though... I couldn't stop at the Biscoff frosting. I had to indulge and make one of these Swiss Meringue Buttercream frostings I've read all about from Sarah. I've never made one like this before, so it was a bit intimating. Trust me, I wish I had a few pictures while making the frosting, but I was freaking out a bit too much. It was a bit more temperamental than I was ready for... but eventually got it to work. It took time for mine to "set up" as it looked all weird, soupy, and then curdled all in a matter of a few minutes, so as my mixer whirled the frosting together, I quickly sought out reinforcements and read up on Swiss meringue frosting.  Go ahead, some day when you are bored, Google it, and be educated about frosting. :) After my, mini freak outs, the frosting came together, and it was pretty and tasted smooth and silky buttery like Sarah frequently mentioned in several blog posts. It was now ready to decorate my moist chocolaty cupcakes!  Here's the link from the recipe I followed for the Swiss Meringue Frosting from Sarah's Kitchen- http://sarahsbritamericankitchen.blogspot.com/2011/12/snowflake-cupcakes.html


This cupcake recipe was so easy to make, that I don't know why you would want to use the boxed mixes, when you can get such great flavor and depth from this recipe! They were super moist and delicious. I will surely make these again. Thanks again Sarah for sharing your great recipes. 


For more information about the Secret Recipe Club, check it out --> http://secretrecipeclub.com

Monday, November 5, 2012

frozen yogurt covered fruit bites

Yummy note: I had a large container of soy yogurt that was getting close to the expiration date, so I knew I needed to use it up quick. I already had made some muffins and didn't want to use it for baking, so I decided I was going to use it for smoothies later. Then it hit me, how about some frozen yogurt bites for the kiddo... Sure, that would work, however, he LOVES fruit, so why not do frozen yogurt fruit bites instead! These sure have been a nice healthy snack to just pop out of the freezer in a snap to enjoy. Next up, I make a bigger batch and throw some in my morning smoothies that way!


Frozen Yogurt Covered Fruit Bites


Ingredients: 
Container of yogurt, your choice, I used what I had leftover, which was a plain flavored soy yogurt.
Fruit - I used blueberries and a sliced banana (next time I want to try strawberries or cranberries perhaps would be a nice sweet treat)


Directions:
Toss blueberries or other desired fruit in a bowl of yogurt. Stir yogurt and fruit, enough to cover.  
 
Then take two toothpicks and begin to fish out your covered fruit. This is the most tedious part, but it really goes by faster than you think, once you get going.


Place yogurt covered fruit onto a waxed paper lined cookie sheet and place uncovered in the freezer for atleast a half hour. At this point, they might be starting to set up a bit, really depends on your freezer. I actually forgot about mine until the next day and then pulled them out of the freezer and they were pretty solid, lol. However, it was perfect for packaging up!
 

I also made a chocolate yogurt covered banana slices, as I still had plenty of yogurt left after the blueberries. I just added in a few teaspoons of cocoa powder and a little drizzle of chocolate syrup for sweetness and it was perfect to taste.
 

I think these were my favorite of the two fruits, as it has been a nice healthy snack when I go looking for ice cream in the freezer!  :) 

Monday, October 15, 2012

Nacho Cheese Dorito Meatballs

Yummy note: I knew I would like this Secret Recipe Club blog assignment this month, I mean it had "Cheese Curd" in the title!  I love my cheese curds.. well, Cheese Curd In Paradise is hosted by Ashley from Wisconsin, so, yeah go Green Bay Packers!  Shh, don't tell my Chicago Bears loving husband... Ashley mentions the Packers several times throughout her blog, so you can tell she is a true Wisconsinite with her blog name and her love of the Packers! :)  So it was a toss up between Darn Good Roast, Root Bear Pork Chops, Dulce de Leche (as I've always wanted to make that) or this- Nacho Cheese Dorito Meatloaf. Yes, it hit me at the one word, Doritos. Yes, that is a guilty pleasure I enjoy from time to time. I especially enjoy them using them in various dishes; make taco nachos, add them to a salad for some cheesy crispy when I don't have any croutons, layer them on top of pizza - aka a Taco Pizza (which is a household favorite here), and of course, use them for a bed under some chili and it's a meal. Ok, so perhaps I use Doritos a lot in my cooking, lol, but when I saw this recipe for meatloaf from Ashley at Cheese Curd In Paradise it was a new one for me and I HAD to try it. I modified the recipe just a tad and made the meatloaf into meatballs instead as they are more kid-friendly in this house (not to mention a quicker bake on busy nights).  I love having leftover meatballs for using with either spaghetti or in a meatball sub sandwich, too! These Nacho Cheese Doritos Meatballs were a nice combination of meat with a slight cheese flavor in a pool of sweet bbq sauce, yeah, now aren't you ready to try this recipe?! 


Nacho Cheese Dorito Meatballs

Ingredients: 
2 lbs ground beef
1 egg
1/2 white onion, diced
1 cup Nacho Cheese Doritos, crushed
1/3 bottle ketchup
1/2 tsp black pepper
1/2 tsp garlic powder
1 tbsp Worcestershire sauce
1/8-1/4 cup barbecue sauce (depending on how much sauce you like)
* Note:  There is no additional salt in this recipe, as the saltiness of the Nacho Cheese Doritos is enough to flavor the meatballs.


Directions: 
Preheat oven to 350 degrees. Then crush the Doritos to a fine crumb, similar to panko bread crumb texture. I just used a big sandwich bag and crushed them with a rolling pin. In a bowl, add in the ground beef, egg, onion, crushed Doritos, seasonings, and Worcestershire sauce. Mix and then add in the ketchup, basically adding enough ketchup to just moisten the meat mixture and stir until well combined.  Spray a baking dish with non-stick cooking spray and assemble the meatballs with your hands to make a nice firm ball.


Bake for about 20 minutes and remove from oven. Drain off any excess grease or drippings in your pan and then add the barbecue sauce on top of the meatballs.


Bake for about another 15 minutes or so, depending on the size of your meatballs until they are done. I got about 2 dozen meatballs from the recipe, but if you are making this in a loaf form instead of meatballs, it will form 1 large loaf. Prepare the same way, but just adjust your baking time. For a meatloaf, bake in a greased 9 x 5 loaf pan in a 350 degree oven for about 35 minutes, then top with barbecue sauce and bake for another 25-30 minutes until done.


Monday, October 1, 2012

Chocolate Peanut Butter Squares for Daniel

Yummy note: This post by far has been one of my tougher posts to pull together on It's Yummy to My Tummy. Over a year or so ago, I started to participate in this recipe blogging group called the Secret Recipe Club. I speak of it often on my bog, as this "club" really has such a great group of people involved. Everyone has a sincere respect for each other and their food blogs, that it has created a sense of community among us all. So when we recently heard the news that a fellow blogger, Daniel Saraga, had recently passed away, we knew it would only be fitting to post a tribute to honor him. I have never personally met Daniel from the Haggis and the Herring, but we all got to know him from his blog posts and comment interactions within our group. Daniel's presence will surely be missed by all. Please take a minute and reflect with his wife, Meredith, as she honors Daniel and his family
From a few comments and posts I recall about Daniel, I remember him noting he enjoyed the peanut butter and chocolate flavor combinations, so I thought I'd make this recipe of his, as a tribute...


Chocolate Peanut Butter Squares

Ingredients: 

For the Cookie Bar: 
1/2 cup white sugar
1/2 cup brown sugar
1/2 cup butter, softened
1/3 cup peanut butter
1 cup all-purpose flour
3/4 cup quick cooking oats
1/2 tsp baking soda
1/4 tsp salt
1/2 tsp vanilla
1 egg
1 cup semisweet chocolate chip

For the Glaze:
1/3 cup powdered sugar
2 tbsp peanut butter
1-2 tbsp milk

Directions: 
Preheat oven to 350 degrees and prepare a 9x13 pan. I lined the pan with parchment paper and then lightly sprayed it with nonstick spray. In a bowl, mix the sugars together with the butter and peanut butter. Stir in the flour, oats, baking soda, salt, vanilla, and egg. Once dough is formed, spread out evenly in the pan. Bake for bars for about 15-20 minutes or until golden brown. Remove from the oven and sprinkle with chocolate chips; the heat will begin to soften the chocolate chips. Let it stand for a few minutes and then spread the melted chocolate over the cookie bar layer. Let it sit until the chocolate is firm. Prepare the peanut butter glaze by mixing powdered sugar, milk, and peanut butter together until it is smooth and thin enough to drizzle over the chocolate layer. Drizzle glaze and then refrigerate again until cool and ready to cut. This is where the parchment paper layer works really well, as you can just remove the bars from the pan easily and cut it on a cutting board.


Monday, September 24, 2012

Frito Chili Pie

Yummy note: Note the chill in the air, and the sweatshirts and jeans are officially out of the closet. Yes, it is chili weather! I used to make a blah, bland chili, aka, meat with tomatoes and beans as my husband would call it. I just couldn't get the seasonings right, until I found the Pioneer Woman's Frito Chili Pie recipe. This recipe rocks, I've made it numerous times since I've first found it. My number one way to eat it is with the Fritos and cheese, but adding corn to this recipe is fantastic, as well as eating this chili on top of noodles or rice. However, you'd like to serve this chili, it is a pretty popular crowd pleaser.


Frito Chili Pie

Recipe from the Pioneer Woman - http://thepioneerwoman.com/cooking/2011/09/frito-chili-pie/


Ingredients:
2 lbs ground beef and/or turkey
1 1/2 tsp prepared minced garlic
1 can tomato sauce
1 can roasted (diced) tomatoes with green chilies
1/2 tsp salt
1 tsp ground oregano
1 tbsp ground cumin
2 tbsp chili powder
1 can pinto beans, drained and rinsed (If using chili beans with seasonings, I leave the sauce then.)
1 can kidney beans, drained and rinsed
* optional - 1/4 cup masa (corn flour) or regular corn meal
* optional - 1/2 cup warm water
A bag of Frito corn chips
Grated sharp cheddar cheese
* optional - diced onion


Directions:
On the stove, brown the meat in a pan. Then dump the browned meat into your crockpot and add in the prepared garlic, tomato sauce, tomatoes, salt, oregano, cumin, and chili powder.


Cover and turn on crockpot on high for about an hour. Add the drained and rinsed beans, stir and simmer in crockpot for another hour. This next step is optional, if you want, add in the masa and water mix to thicken up your chili and to add another layer of flavor to the chili. Lastly, mix the masa with water, then add to the chili. Stir to combine and simmer for final 30 minutes or so until it has thickened up a bit. Now, it is time to enjoy the chili and serve on top of Fritos chips and garnish with cheese and onion if you wish. Another add-in we’ve been enjoying with this recipe, is if we don’t add in the masa mix, we will often toss in a can of corn into the chili to add more depth to the dish. Enjoy!  


Monday, September 10, 2012

Funnel Cakes

Yummy note: As summer comes to a close, I realized we haven't been to any of those carnivals or community fairs this summer. I mean, I'm not really into it at all, except for well, going and getting the food there. I love the corn dogs, caramel apples, cheese curds, kettle corn, cotton candy, and you know, the deep fried anything. Oh wait, back to the matter at hand... the Secret Recipe Club time!  This month, like many other months, I didn't know where to start. When I began my search for this month's Secret Recipe Club, I really was all over the place with my assigned blogger, No Reason Needed. Carol's site has a mix of family blogging, along with her variety of recipe posts. There were so many great choices that once I began my search, I was torn. My husband wanted the taco dish, I was eyeing the meatloaf as I am always looking for easy and tasty meatloaf recipes.  But I decided to go with what I thought the kids would like too, well, secretly what I was hungry for.. shh..don't tell.. I'd like some of that--> the powdered sugary deep fried goodness.  A recipe that totally reminded me of all of those great feelings of nostalgia of country fairs and festivals would be it. I saw this recipe for funnel cakes, I thought this would be an awesome treat, something I normally wouldn't go crazy and make. I tried churros one time and failed miserably, so I was a little nervous at first. This time around though, in my trusty Le Creuset, I fired up my little pot of oil, and knocked this one out of the park.


Funnel Cakes 


Ingredients: 
1 egg
2/3 cup milk (I used soy milk here.)
2 tbsp white sugar
1 1/4 cups flour 
1 tsp salt 
1 tsp baking powder 
about 2 cups of oil for frying
optional: water, if needed to thin out the batter

Directions: 
In a deep skillet or pan, heat about 2 cups of oil over medium heat until hot while you begin to make the funnel cake batter. Make sure you test the oil later before pouring the batter in. Measure out dry ingredients (sugar, salt, flour, and baking powder) in a small bowl. In a larger bowl, mix the egg and milk together. Once the egg and milk is beaten together, gradually add in your dry ingredients. The batter will become fairly thick. So if needed, add in some additional water to help make the funnel cake batter smooth. Test the heated oil and see if it is ready and make sure it is not too hot. It is is smoking when you do a test drop, turn down the heat a bit and wait.  


Next, pour the batter in a funnel or a large gallon sized baggie. If using the baggie approach, snip off a small corner of it, and begin to squeeze the batter in the hot oil. Squeeze in a web-like pattern, circular pattern until you have reached a desired shape or amount of batter. Fry for about 2-3 minutes, with a flip over halfway. It really doesn't take very long at all, so once they begin to turn puffier and a golden brown, remove the crispy fried goodness from the pan. 

Sprinkle with powdered sugar for the classic funnel cake preparation. Get creative, and check out the other options below to top your funnel cake!   

Note, for the caramel apple version above, I used another No Reason Needed recipe I liked. Carol's fried apple recipe made an amazing gooey, sweet topping. It tasted like a warm apple pie, really it was pretty delicious... 


Monday, August 13, 2012

Mongolian Chicken and Caramel Bars

Yummy note:
Decisions, decisions... way too many wonderful recipes to choose from for this month's Secret Recipe Club assignment. My newest assignment for this month's SRC was a blog called Robin, Restored, formally known as Penny Pinching Provisions. Seriously, you must check out this blog and see all of the great ideas, meal plans, and recipes that Robin shares. Originally I thought I wanted to make something with zucchini as I had a few sitting on my kitchen counter just itching to be used. Instead, I stumbled on this caramel bar recipe as I was looking through Robin's zucchini posts! :) This one showed up below on the "you might also like" area and I decided it captured my sweet tooth instantly. Caramel bars with just a few ingredients, seriously, yummy. However, I couldn't stop with just one recipe though, I had to try out the Mongolian Chicken, as well! Wow, my husband thought we had take out as it was so good and it turned out beautifully. Not to mention fairly easy and affordable, too! I love that I had all the ingredients readily available to make this tasty main dish for a quick mid-week meal. I might just have to say that since I've been with the Secret Recipe Club, which is over a year now, I believe this is one of my favorites.


Mongolian Chicken 

Ingredients: 

For the Chicken:
1/3 cup canola oil
1 lb chicken, cut up into small pieces
¼ cup cornstarch

For the Sauce:
2 tbsp oil
1 tsp ginger
2 tbsp garlic
½ cup soy sauce
¾ cup brown sugar

Optional: green onions, brown rice, and veggies

Directions: 
Prepare the chicken pieces and cut into smaller bite-sized like pieces. Place chicken into a plastic bag and toss in the cornstarch. Shake the chicken pieces in the cornstarch until they are completely coated. Let them sit for about 10 minutes. While these are resting, start up on the sauce for the chicken.
Heat 2 tbsp of oil in a wok and add in the ginger and garlic and sauté quickly.  Stir in soy sauce and brown sugar. Simmer for about 2-3 minutes or until the sugar is dissolved. Set aside and reserve the sauce for later.


Clean the sauce out of the wok and heat up about a 1/3 cup of oil in the wok. Once it begins to heat up, add in your chicken and begin to sauté. Cook the chicken, probably about 5-7 minutes total, or until the chicken is fully cooked. Pour in the reserved sauce and simmer for a few minutes as the sauce thickens. Add in the chopped green onion to finish the dish. Remove from the heat and serve with rice. I paired it with a simple vegetable dish on the side as well, and it made for a well-rounded meal. 


...and now for dessert! 


Caramel Bars

I followed Robin's recipe and made just a few substitutions to suite our family's needs. For the butter, I used a soy margarine, and for the pecans, I used crushed pretzel chips! This was such a goey, salty, sweet, buttery, and delicious treat to enjoy. 

Ingredients: 
1/2 cup soy margarine
1 cup plus 2 tbps brown sugar
1 egg
1 tsp vanilla
3/4 cup flour
1 tsp baking powder
1 cup of crushed pretzel chips

Directions: 
In a saucepan, melt margarine and brown sugar until dissolved over medium heat. Cool slightly and pour into a bowl with the egg and vanilla. Stir together and add in the flour and baking powder. Once combined, add in the crushed pretzel chips and pour into a prepared lightly greased 8 x 8 pan. Bake in a preheated 350 degree oven for about 20-25 minutes or until the edges of the caramel bars start to crisp up. Wait until the bars are cooled and then cut to enjoy!


Friday, August 10, 2012

Dark Cherry Chocolate Chunk Ice Cream

Yummy note: It's almost nearing the end of the summer, and I finally got around to stirring up some homemade ice cream for the kids. It is not just any ordinary ice cream, as this particular ice cream is dairy-free! My oldest child would eat ice cream morning, noon, and night if I let her. Sadly, my youngest child never really gets ice cream due to a milk allergy, so I immediately wanted to fix that. He's had fruit sorbets in the past, but it just isn't the same cool creamy yumminess that you get from ice cream. So immediately, I went to my go-to website for dairy-free recipe ideas from Silk. They have some great tips here for cooking and baking with soy milk, so I knew this recipe from Silk was my starting point. I ended up adding in some dark cherries and some dairy-free chocolate pieces to make an amazing combination. The cherry flavor wasn't too overwhelming, but if you are looking for a strong cherry flavored ice cream, you might want to add in a few tablespoons of cherry juice/extract to bump up the flavor. Or perhaps if you are making this for an adult treat, I bet a nice cherry liqueur would be a wonderful addition to this delicious frozen treat.

Dark Cherry Chocolate Chunk Ice Cream


Ingredients:
3/4 cup of soy milk (I used Silk Vanilla)
2 cups of soy creamer (I used Silk Original Creamer)
1 1/2 cups of pitted dark cherries
1/2 cup of agave or sugar
1 vanilla bean
2 tablespoons of arrowroot (or cornstarch)
1/2 cup of dairy-free chocolate chunks
Optional: 1/4 cup of cherry preserves or few tablespoons of cherry liqueur  
*Note: You want to yield about 4 cups total of ice cream mix to put into your ice cream maker.


Directions: 
Pit cherries and cut them into pieces. Place 1/2 cup of vanilla soy milk, a split vanilla bean, creamer, agave, and cherries into a saucepan. (Note: To prepare a split vanilla bean, cut the vanilla bean open and scrape seeds into the saucepan and toss the empty pod into the pan as well to infuse the flavor more.) Heat the mixture on medium heat for about 5 minutes or until the mixture begins to simmer. Stir and remove from the heat. Mix 2 tablespoons of arrowroot into the remaining cold creamer and then whisk into the warm mixture. Cover the pan and let the mixture sit for about 15-20 minutes.


Remove the vanilla bean. This next step is optional- if you want, puree the cherry mixture in a blender to chop up the cherries a bit. Do it to your preference; my kids like the smaller pieces, so I went fairly small, perhaps if you want large chunks of cherries you could just omit this step. Next, chill the mixture completely. This is very important or else the ice cream will not set up properly in your ice cream maker. Process the mix according to your ice cream maker's directions.


While the ice cream is churning, chop up about 1/2 cup of dairy-free chocolate chunks to toss into the ice cream mix. Towards the end of the ice cream processing time, add in your chocolate. You could also add in a flavorful cherry preserve or jam at the end to make ripple ribbons of fruit throughout the ice cream. Enjoy the soft set ice cream immediately, or freeze the ice cream for a few more hours in an air tight container until ready to serve. Makes about one quart of ice cream.


Serve with some fresh fruit!
Garnish with a dairy-free chocolate syrup! 


Want another fun ice cream idea? Use this recipe from Silk, but substitute the Soy Original flavor with the Silk Chocolate flavor! Treat yourself to a frozen chocolaty treat.


Friday, July 27, 2012

Pancake and Sausage Muffins

Yummy note: Seriously, these rock.  I think I saw it before and people called it a “puffin” – basically mini baked pancake muffins!  I’m not sure where I first saw something along these lines, but it is sure genius. Especially when you can bake the sticky gooey sweet syrup right inside the pancake and it doesn't get all over! It is an easy clean up on those busy days! There are a bunch of homemade mix recipes out there, but for our house, pancakes are often a quick meal for us to throw together. Knock yourself out and use a homemade pancake mix if you wish, but the Bisquick worked quick and easy. When we are busy and on the run, the least amount of hassle, the better. Using a premade pancake mix, like Bisquick, it is as easy as 1-2-3 practically to make handheld pancake muffins pretty quick. These are like a meal on the go, when you toss in some precooked sausage or bacon and drizzle in a little syrup. Delicious. Mnnnmnnmn… When I made these, both kids, seriously gobbled down I think atleast 2 muffins. It was a total hit.


Pancake and Sausage Muffins

Ingredients: 
2 cups Bisquick2/3 cup milk (we used soy milk)
2 eggs
about a 1/3 - 1/2 cup of pancake syrup
1 cup of cut up precooked breakfast sausage*
* Could also use various other add-ins instead of the sausage, such as bacon, blueberries, chocolate chips, bananas, etc..) 


Bisquick mix in the pantry is a staple in my kitchen! 


Directions: 
Preheat oven to 350 degrees. Prepare your muffin To make the process even easier, use a large measuring cup or easy to pour bowl to stir the batter up in.

That way you can just pour the mix directly into the tins. Stir together the pancake mix, with the milk, eggs, and syrup. Mix together and pour in greased muffin pan or pour into cupcake liners. 


Top with already cooked sausage or any other additional add-in you’d like. 


Bake for about 15-20 minutes or until they start to set up and get a little golden brown on top. Remove from pan and serve warm. These little things warm up nicely the next day as leftovers too, if they last that long! :) 


Enjoy with a little butter on top. Best served warm for breakfast, supper, or an anytime treat.